Git Tutorial
When several people collaborate in the same project, it’s possible to accidentally overlook or overwrite someone’s changes. The version control system automatically notifies users whenever there’s a conflict between one person’s work and another’s.
Keeping a record of what was changed, when, and why is extremely useful for all researchers if they ever need to come back to the project later on .
Here is a comprehensive argument for why researchers should always use version control software.
For a comprehensive overview, log in to your LinkedIn Learning account with your PC ID and complete the Git from Scratch course.
Installing git
To use git you should:
- Make sure that you have git installed on your computer.
There are several ways to install Git on a Mac. The easiest is probably to install the Xcode Command Line Tools. On Mavericks (10.9) or above you can do this simply by trying to run git from the Terminal the very first time.
$ git --version
If you don’t have it installed already, it will prompt you to install it.
There are also a few ways to install Git on Windows. The most official build is available for download on the Git website and the download will start automatically. Note that this is a project called Git for Windows, which is separate from Git itself.
Sign up for a GitHub account
In your computer’s file browser ensure that you can see:
Invisible files and folders (On the Mac these start with a period e.g.
.git)File extensions (This is the part of the filename at the end after a period. For example in the filename
test.docthe extension is.doc)Many of the files that git needs to function are files that begin with a period which are invisible files on the Mac OS (operating system).
How to show file extensions and invisible files on a Mac
To show invisible files on a Mac, open Finder, navigate to the desired folder, and press Command + Shift + . (period) on your keyboard; this keyboard shortcut will reveal hidden files, which will appear slightly grayed out compared to regular files.
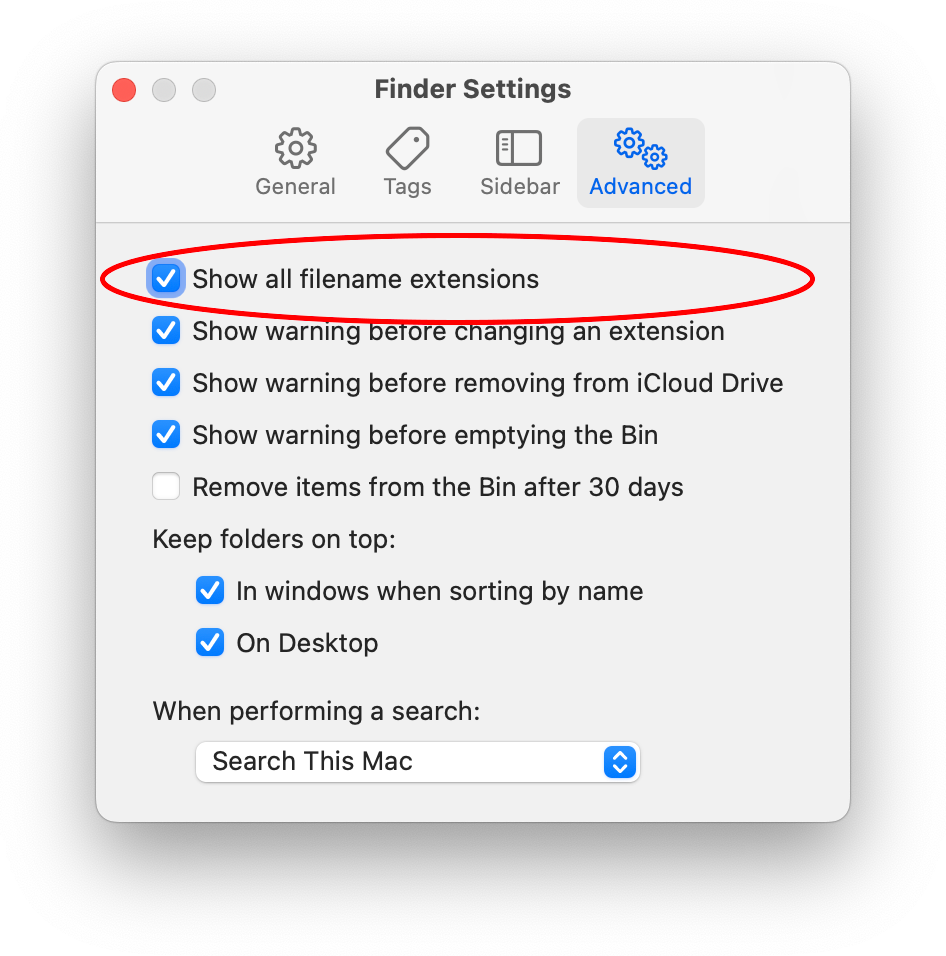
To show file extensions on a Mac, (a) open the Finder app, (b) select Finder > Settings, (c) click Advanced (d) select Show all filename extensions
How to show file extensions and invisible files on a Windows PC
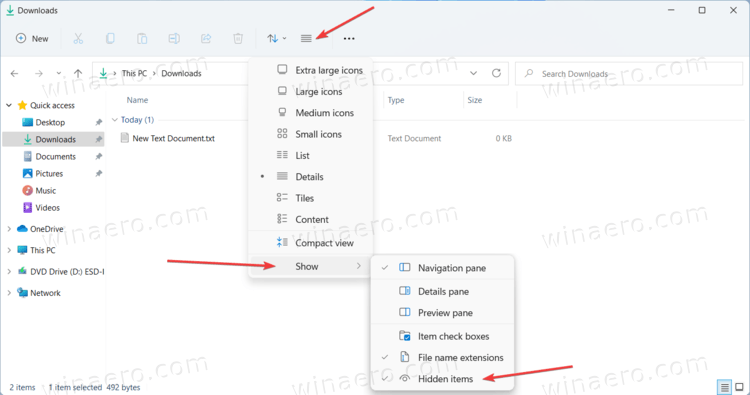
To show hidden files and file extensions in Windows 11, Open File Explorer, select the View tab, select Show, select File name extensions to view file extensions, select Hidden items to view hidden files and folders
Creating A Repository
To get started you can either clone someone else’s repository from GitHub, or create a repository from scratch on your computer and then upload it to GitHub
Method 1: Cloning a repository from GitHub
Here is the GitHub Workflow for Repos that you don’t own:
Start by forking (made an individual copy of) the repo to your github.com account.
Now, you should clone the forked repo, i.e.g make a copy of it on your local computer.
You can then edit the files in your local copy of the repo and commit the changes.
You can then push those changes back up to your forked repo on github.com.
Finally, you can make a pull request to update the central repository with our changes.
A repository on GitHub exists as a remote repository. To work on the files on your own computer, you should clone the repository which will create a local copy on your computer.
Choose one of the following methods:
(1) R Studio Method
- Find and copy the URL for the repository on GitHub
- Run the following command:
usethis::create_from_github("https://github.com/YOU/YOUR_REPO.git", destdir = "~/path/to/where/you/want/the/local/repo/")
The first argument is the URL that you copied from GitHub. The destdir argument specifies the parent directory where you want the new folder (and local Git repo) to live. If you don’t specify destdir, usethis defaults to the desktop.
(2) Generic Method
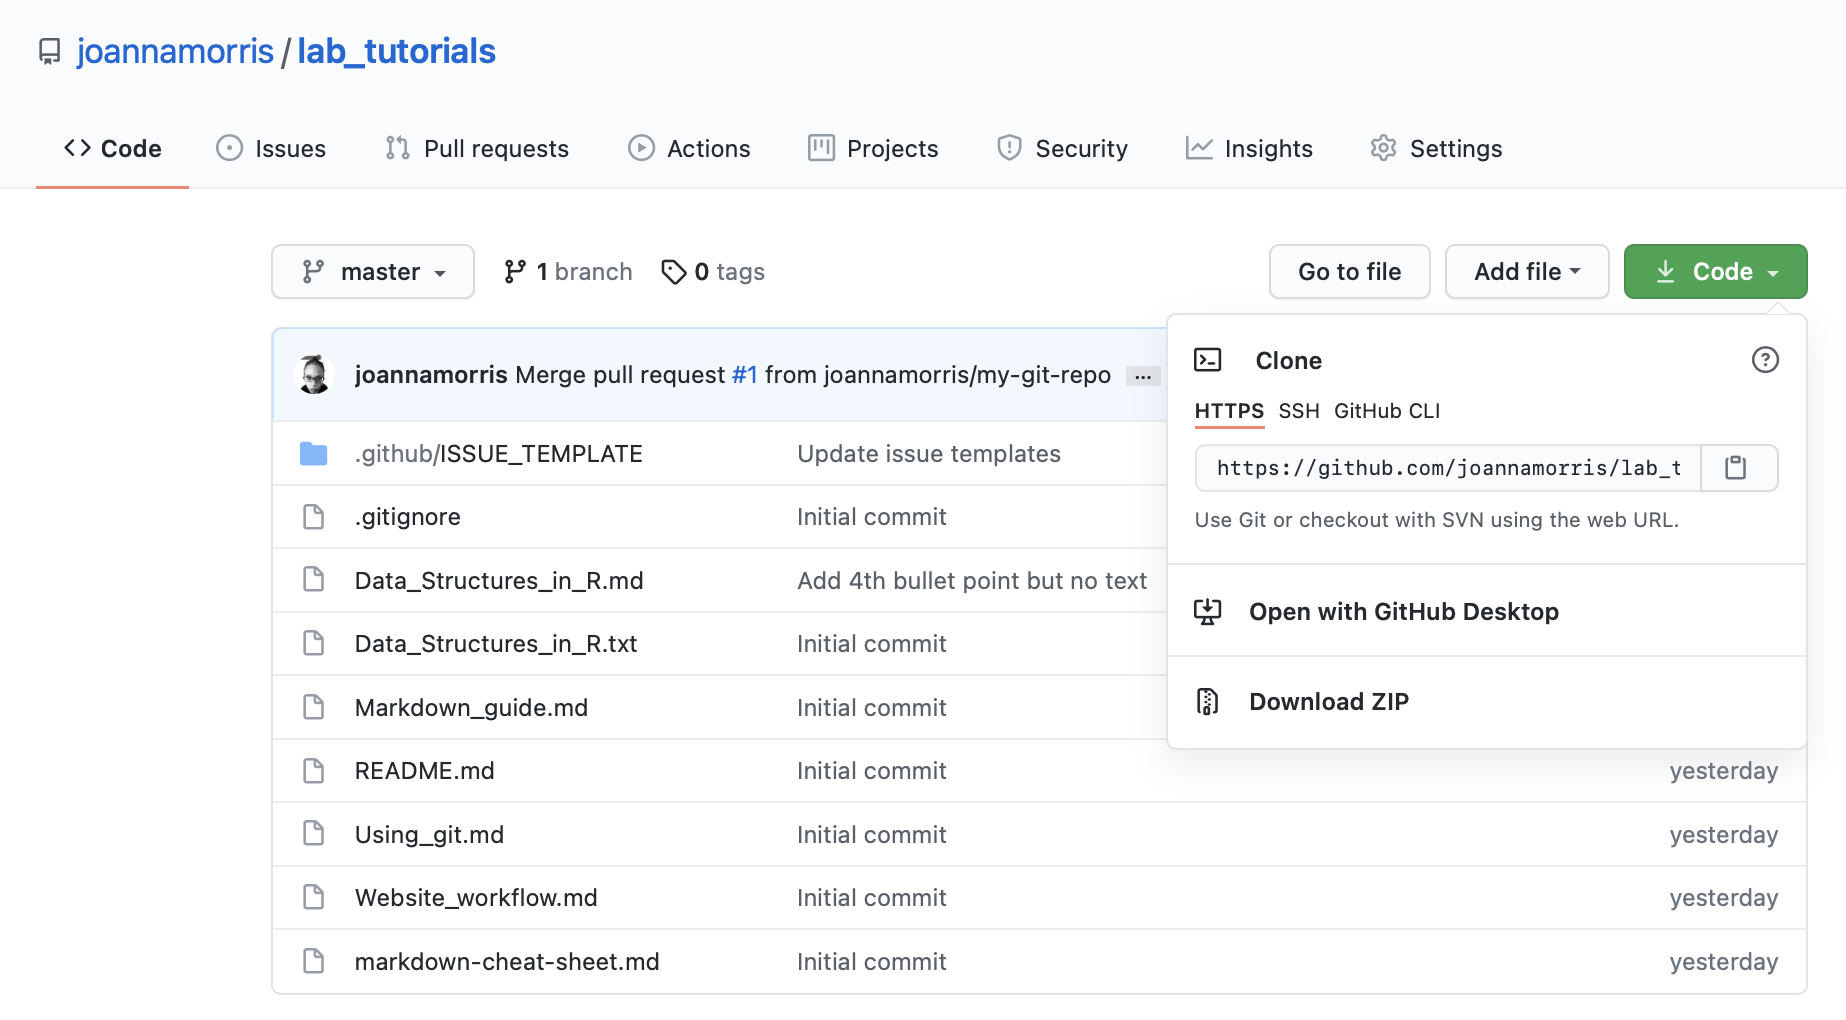
- Find the URL for the repository on GitHub
In the terminal, navigate to the directory on your computer to which you want to copy the repository e.g
cd ~/my_git_reposOnce in that directory, type
git clone https: [your_repository]. For examplegit clone https://github.com/joannamorris/lab_tutorials.git
A note on ‘forking’ vs ‘cloning’
A fork is a copy of a repository that is on your GitHub account, as opposed to the account of the original repository owner.
When you ‘fork’ a repository, you clone a remote copy of the repository on your GitHub account.
You can then make another clone of the forked repository on your local computer.
When you edit files in the cloned repository (on your local computer), you can push (or upload) the changes to the forked repository on your GitHub account.
These changes to the forked repository can be merged with the original repository via a pull request which is a request to the original the repository owner to merge your changes with (or pull your changes into) the original repository.
Summary of the steps to editing files in a github repositories that you don’t own:
Step 1: Fork a repository to your_repository own GitHub account.
Step 2: Clone the repository to your local machine.
Step 3: Edit the files and commit these edits to the local repository. You can apply a single commit or multiple commits to the repository. But everything happens on your local system.
Step 4: Push the modifications to the upstream repository on your account (the fork).
Step 5: Send a request to the owner of the original repository to merge (pull) the changes into the main central repository. This is a pull request.
Linking local and remote repositories
Using the terminal, The
remotecommand shows which remote repositories are currently connected to your local repository.Each connection to your local repository has a name and a URL.
When you clone a repository, the command automatically adds that remote repository under the name
origin.When you fork a repository, it’s good practice to regularly sync your fork with the upstream repository. Otherwise, changes made to the original repository will not be propagated down to the copy on your GitHub account (the fork) or the clone of the fork on your local compute r.
You must configure a remote that points to the upstream repository in Git to sync changes you make in a fork with the original repository. This also allows you to sync changes made in the original repository with the fork.
To summarise, you should connect the fork on your GitHub account to the original repository, and connect your local clone of the fork to both the fork and the upstream original repo.
Recall that when you cloned the repository on your computer, the
git clonecommand automatically added (linked) a remote repository called ‘origin’.You should now add another link to the original upstream repo called ‘upstream’ that will allow you to pull changes from the original repo
$ git remote add upstream https://github.com/ORIGINAL_OWNER/ORIGINAL_REPOSITORY.git
Method 2: Creating a repository from local files on your computer
If your project already exists locally (on your computer), but is not yet under version control with git, you must transform the folder containing your files into a Git repository. This is only run once, even if other collaborators share the project.
Create a new repository on GitHub.com. To avoid errors, do not initialize the new repository with README, license, or
.gitignorefiles. You can add these files after your project has been pushed to GitHub.In the command line, navigate to the root directory of your project.
If you’re using Git 2.27.1 or an earlier version, you can set the name of the default branch the following command:
git init && git symbolic-ref HEAD refs/heads/main- Initialize the local directory as a Git repository. If you’re using Git 2.28.0 or a later version, you can set the name of the default branch using the command
git init -b main
- Initialize the local directory as a Git repository. If you’re using Git 2.28.0 or a later version, you can set the name of the default branch using the command
You can tell Git which files and directories to ignore when you make a commit by creating a
.gitignorefile in your repository’s root directory using the following command:touch .gitignoreYou can then edit the file to include the list of file to ignore. GitHub maintains an official list of recommended
.gitignorefiles for many popular operating systems, environments, and languages in thegithub/gitignorepublic repository.To share the ignore rules with other users who clone the repository, commit the
.gitignorefile in to your repository.Add the files in your new local repository using the command
git add. This stages them for the first commit.Commit the files that you’ve staged:
git commit -m "initial commit"Copy the URL for the remote repository on Github and set the remote locally using the following command:
git remote add origin <REMOTE_URL>Verify the new remote URL:
git remote -vPush the changes in your local repository to GitHub.com:
git push -u origin main
Fetching, Pulling, Pushing, Merging and Syncing
The git commands
fetch,pull,merge,pushandsyncIn git you are not supposed to commit work on remote branches (you are supposed to do your work on local branches)
Remote branches should contain copies of commits coming from remotes, never commits created locally.
The command
git fetch originfetches any new work that has been pushed to that server since you cloned (or last fetched from) it.The
git fetchcommand only downloads the data to your local repository.If I want get changes from the remote repository called
origininto my local repository I typegit fetch origin.It doesn’t automatically merge it with any of your work or modify what you’re currently working on. You have to merge it manually into your work when you’re ready.
the
git pullcommand is agit fetchcommand followed by agit mergecommand.Git
syncdoes everything in one command meaningpullandpush.
Branching and Merging
To view the branches in a Git repository, run the command
git branchTo see both local and remote branches use
git branch -aorgit branch --allTo see details of each brach use
git branch -vorgit branch --verbosegit checkout -b NEW_BRANCHcreates a new branch and checks out the new branchgit branch NEW_BRANCHcreates a new branch but leaves you on the same branch.In other words
git checkout -b NEW_BRANCHdoes the following:git branch NEW_BRANCHcreates a new branchgit switch NEW_BRANCHswitches to the new branchTo merge the new branch back into the main branch, All you have to do is check out the branch you wish to merge into by typing
git checkout OLD_BRANCH. This switches you back to the old branch.You then run
git merge NEW_BRANCHand this merges the new branch into the old branch.
Using GitHub with Rstudio
Configure git with Rstudio
Set your user name and email:
usethis::use_git_config(user.name = "YourName", user.email = "your@mail.com")Create a personal access token for authentication:
usethis::create_github_token()Call
gitcreds::gitcreds_set()to register this token in the local Git credential store
OR
Set personal access token:
credentials::set_github_pat("YourPAT")Verify settings:
usethis::git_sitrep()
prints info about your current Git, gert, and GitHub setup. “Sitrep” is short for “situation report”.
- Restart R!
Configure Git to use the osxkeychain
By default, git credentials are not cached so you need to tell Git if you want to avoid having to provide them each time Github requires you to authenticate. On Mac, Git comes with an “osxkeychain” mode, which caches credentials in the secure keychain that’s attached to your system account.
You can tell Git you want to store credentials in the osxkeychain by running the following:-
git config --global credential.helper osxkeychainTo actually add your credentials to the osxkeychain you need to issue a command to interact with Github which requires authentication, e.g.
git cloneorgit pull.When you are prompted to supply your Password for ‘https://username@github.com’ : you enter your access token instead.
Your token should now get cached in the osxkeychain automatically.
$ git clone https://github.com/username/repo.gitCloning into 'repo'...Username for 'https://github.com': your_github_usernamePassword for 'https://username@github.com': your_access_token
Accessing GitHub via SSH
You can also connect to GitHub using the Secure Shell Protocol (SSH), which provides a secure channel over an unsecured network.