The Complete Guide to the Morph21 EEG Study
Below, you will find information regarding (i) supplies to bring, (ii) preparing for a participant, (iii) running a participant, and (iv) cleaning up after a participant. Please carefully read through all of the information below before your first experimental run. Slack Emma with any questions.
Things to Bring
Please make sure to bring the following items with you:
- PC ID Card
- PC Network Credentials
- GitHub Credentials
Preparing the Lab for a Participant
Arrive at the lab at least 15 minutes before the scheduled start time
Unlock the control room (Sowa Hall room 0148) by swiping your ID card and entering your pin. Use the door stop to prop open the door. Put down any personal items in the control room except for your ID card.
Turn on the computers in the control room. Log in with your PC credentials.
Unlock the experimental room (Sowa Hall room 0149). Walk through the room and ensure that it is clean and properly prepped for the study. Refer to the supplies sheet hanging under the electrodes for a checklist of needed supplies. Slack Emma if any items are missing or running low.
Turn on the computers in the experimental room and log in with your PC credentials.
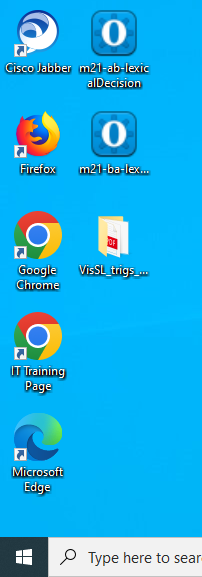
Check to see if the following files and folder are already downloaded to the desktop:
- m21-ab-lexicalDecision.osexp
- m21-ba-lexicalDecision.osexp
- VSL_trigs_local folder
If the files are not on your desktop, you’ll need to open a browser, log onto GitHub, and download them:
- Open the morrislab-pc repo in GitHub
- Navigate to the m21_vsl repo
- Click the green Code button and select Local > Download Zip
- Open the zip file
- Drag the M21 OpenSesame Experiment files to your desktop
- Reopen the zip file
- Copy the entire VSL_trigs_local folder to your desktop
- Here’s what your desktop should look like before the participant arrives:
Once the files have been downloaded, we want to make sure we are able to run both portions of the experiment as expected. This way, if there are any technical difficulties, we can troubleshoot them before the participant arrives and switch accounts if needed.
Double click on one of the OpenSesame files. Make sure you can launch the experiment as expected.
Next, check the VSL portion of the experiment in Presentation. Open the desktop folder and double click on the VSL_triggers_2023 experiment file (not the scenario file!).
Pull up the Qualtrics questionnaire in a browser window.
Running a Participant
Greet the participant when they arrive and explain the study to them. Invite them to sit in front of the ViewPixx monitor and to fill out the Informed Consent portion of the questionnaire.
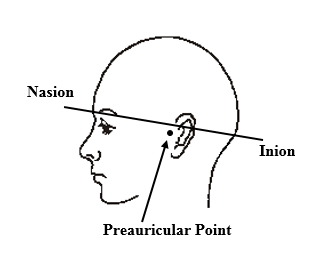
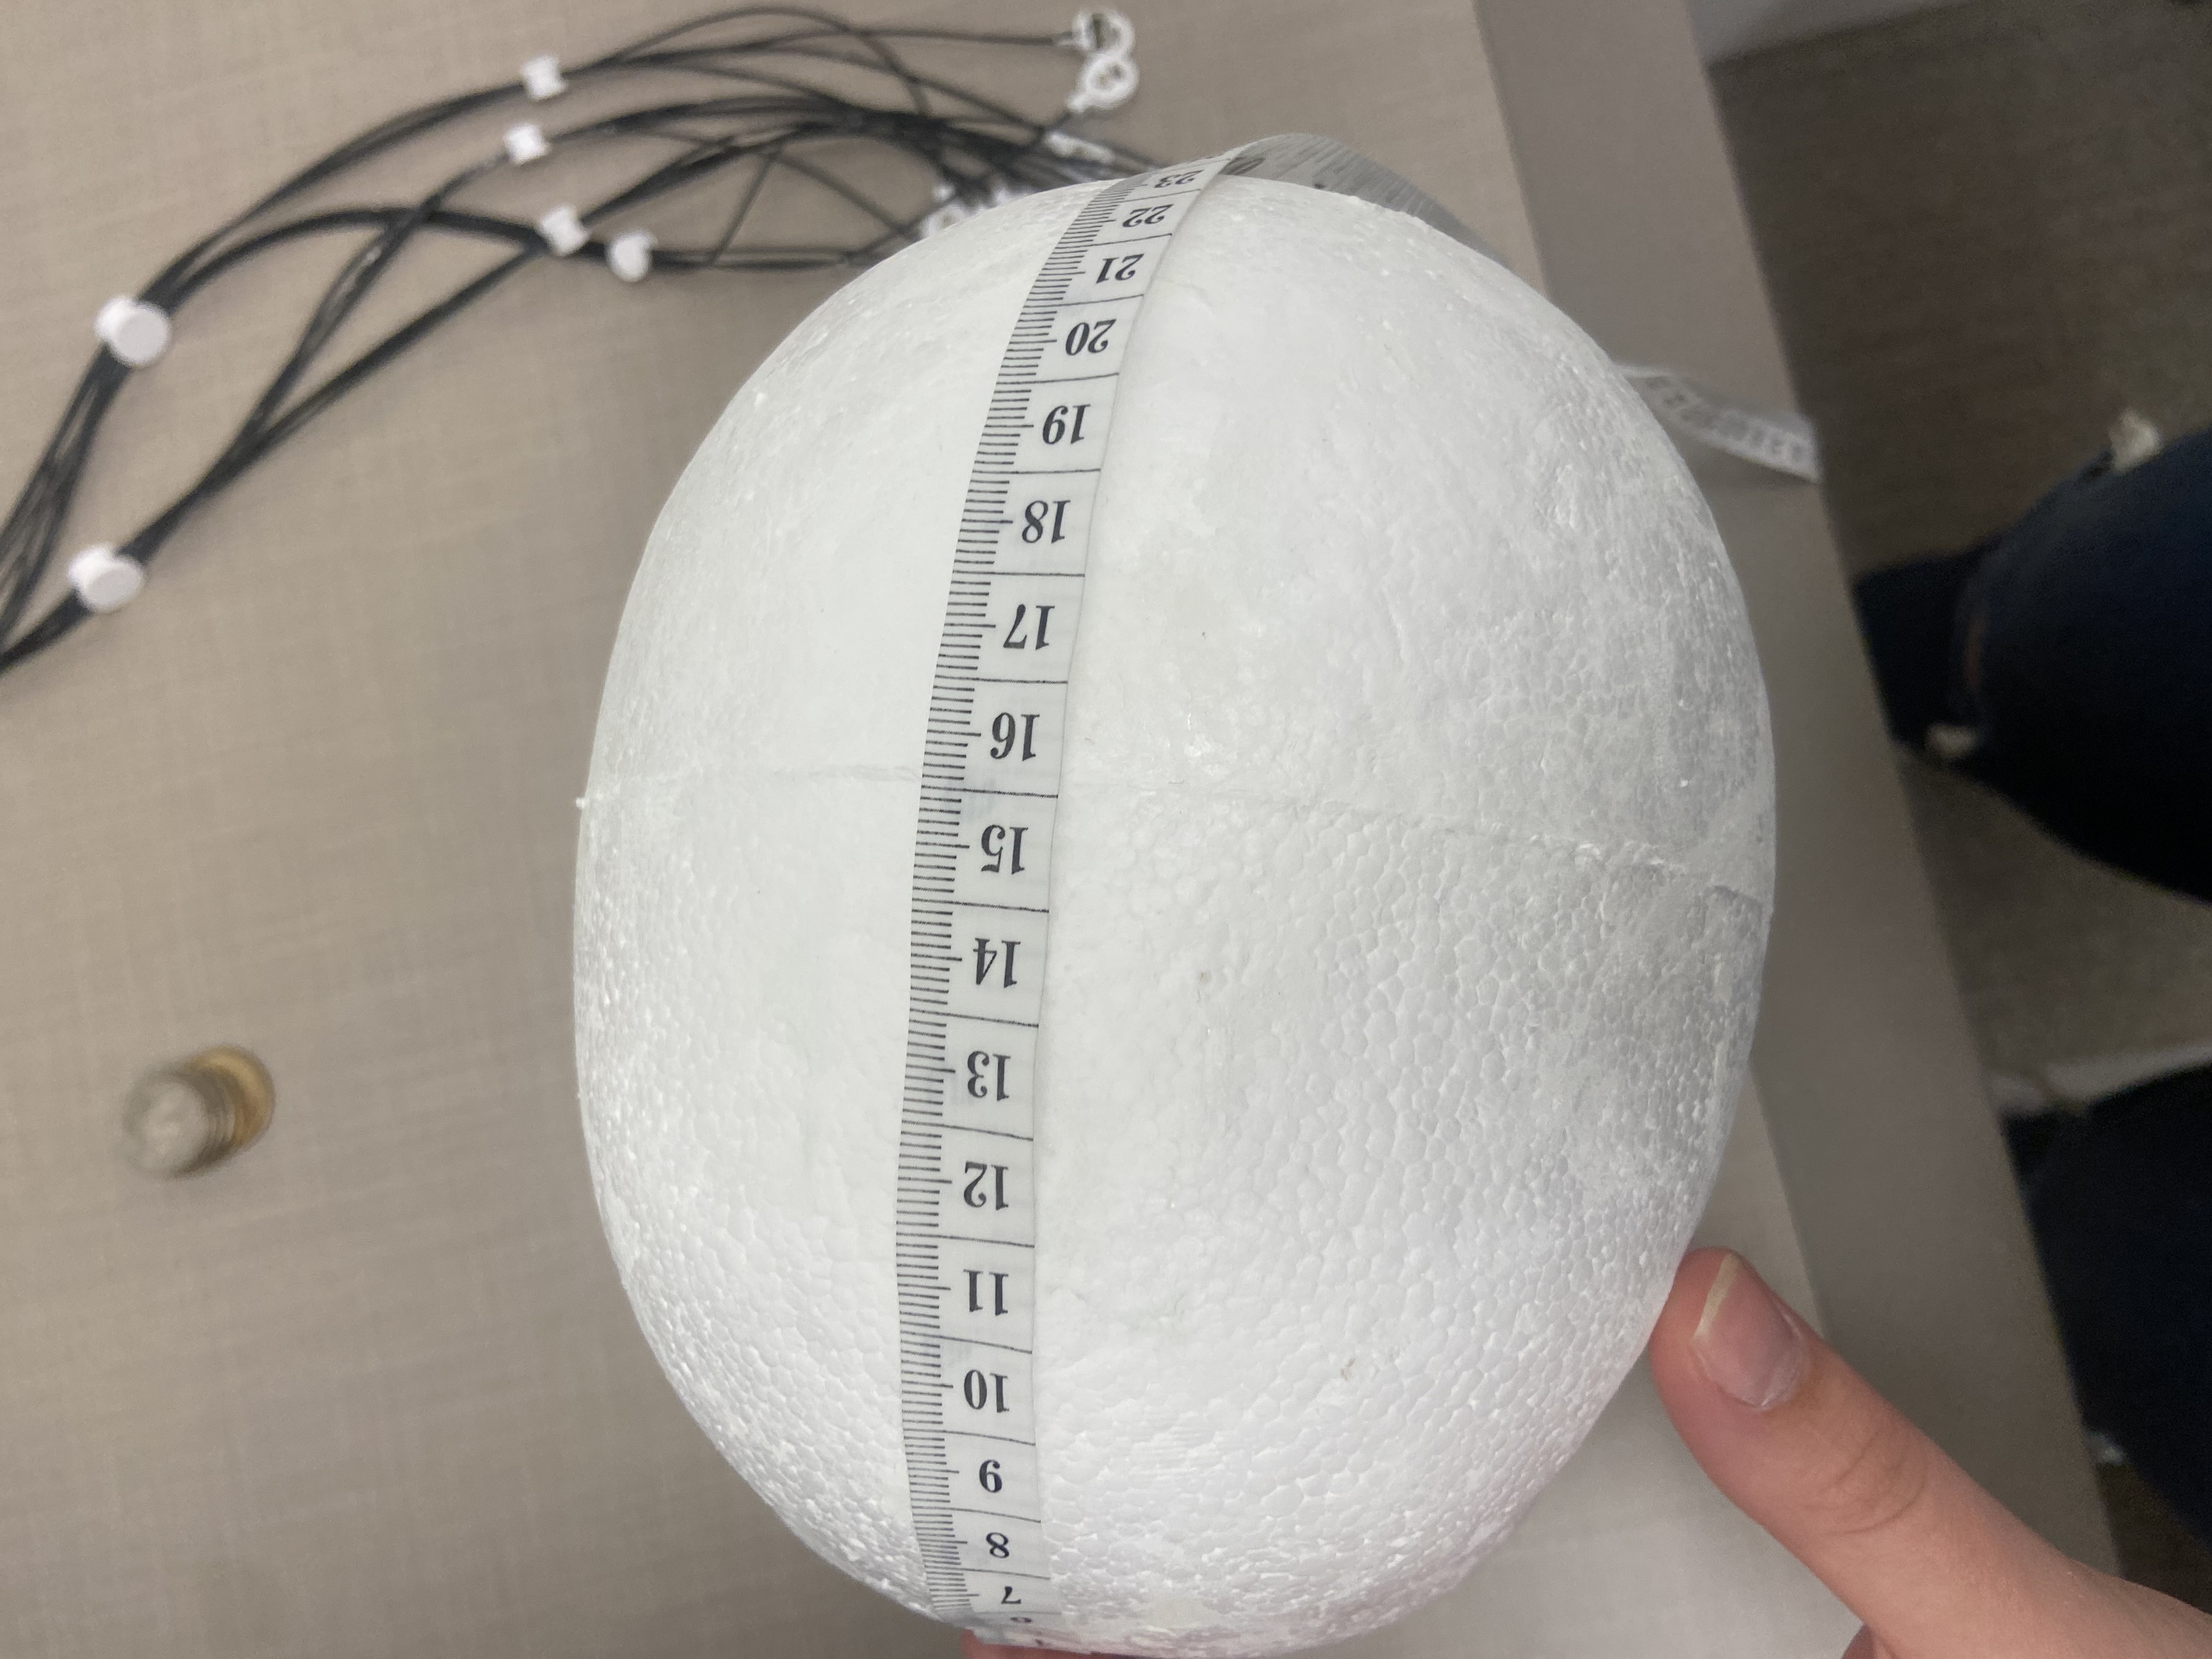
Once the participant has filled out the Informed Consent survey question, ask them to pause so you can take their head measurements. First, use the tape measure (top rack of the back supplies cart) to measure the circumference of their head in centimeters. You will want to measure through the nasion (bridge of the nose) and the inion (inward curve at the back of the head) but above the ears. Refer to the diagram below.
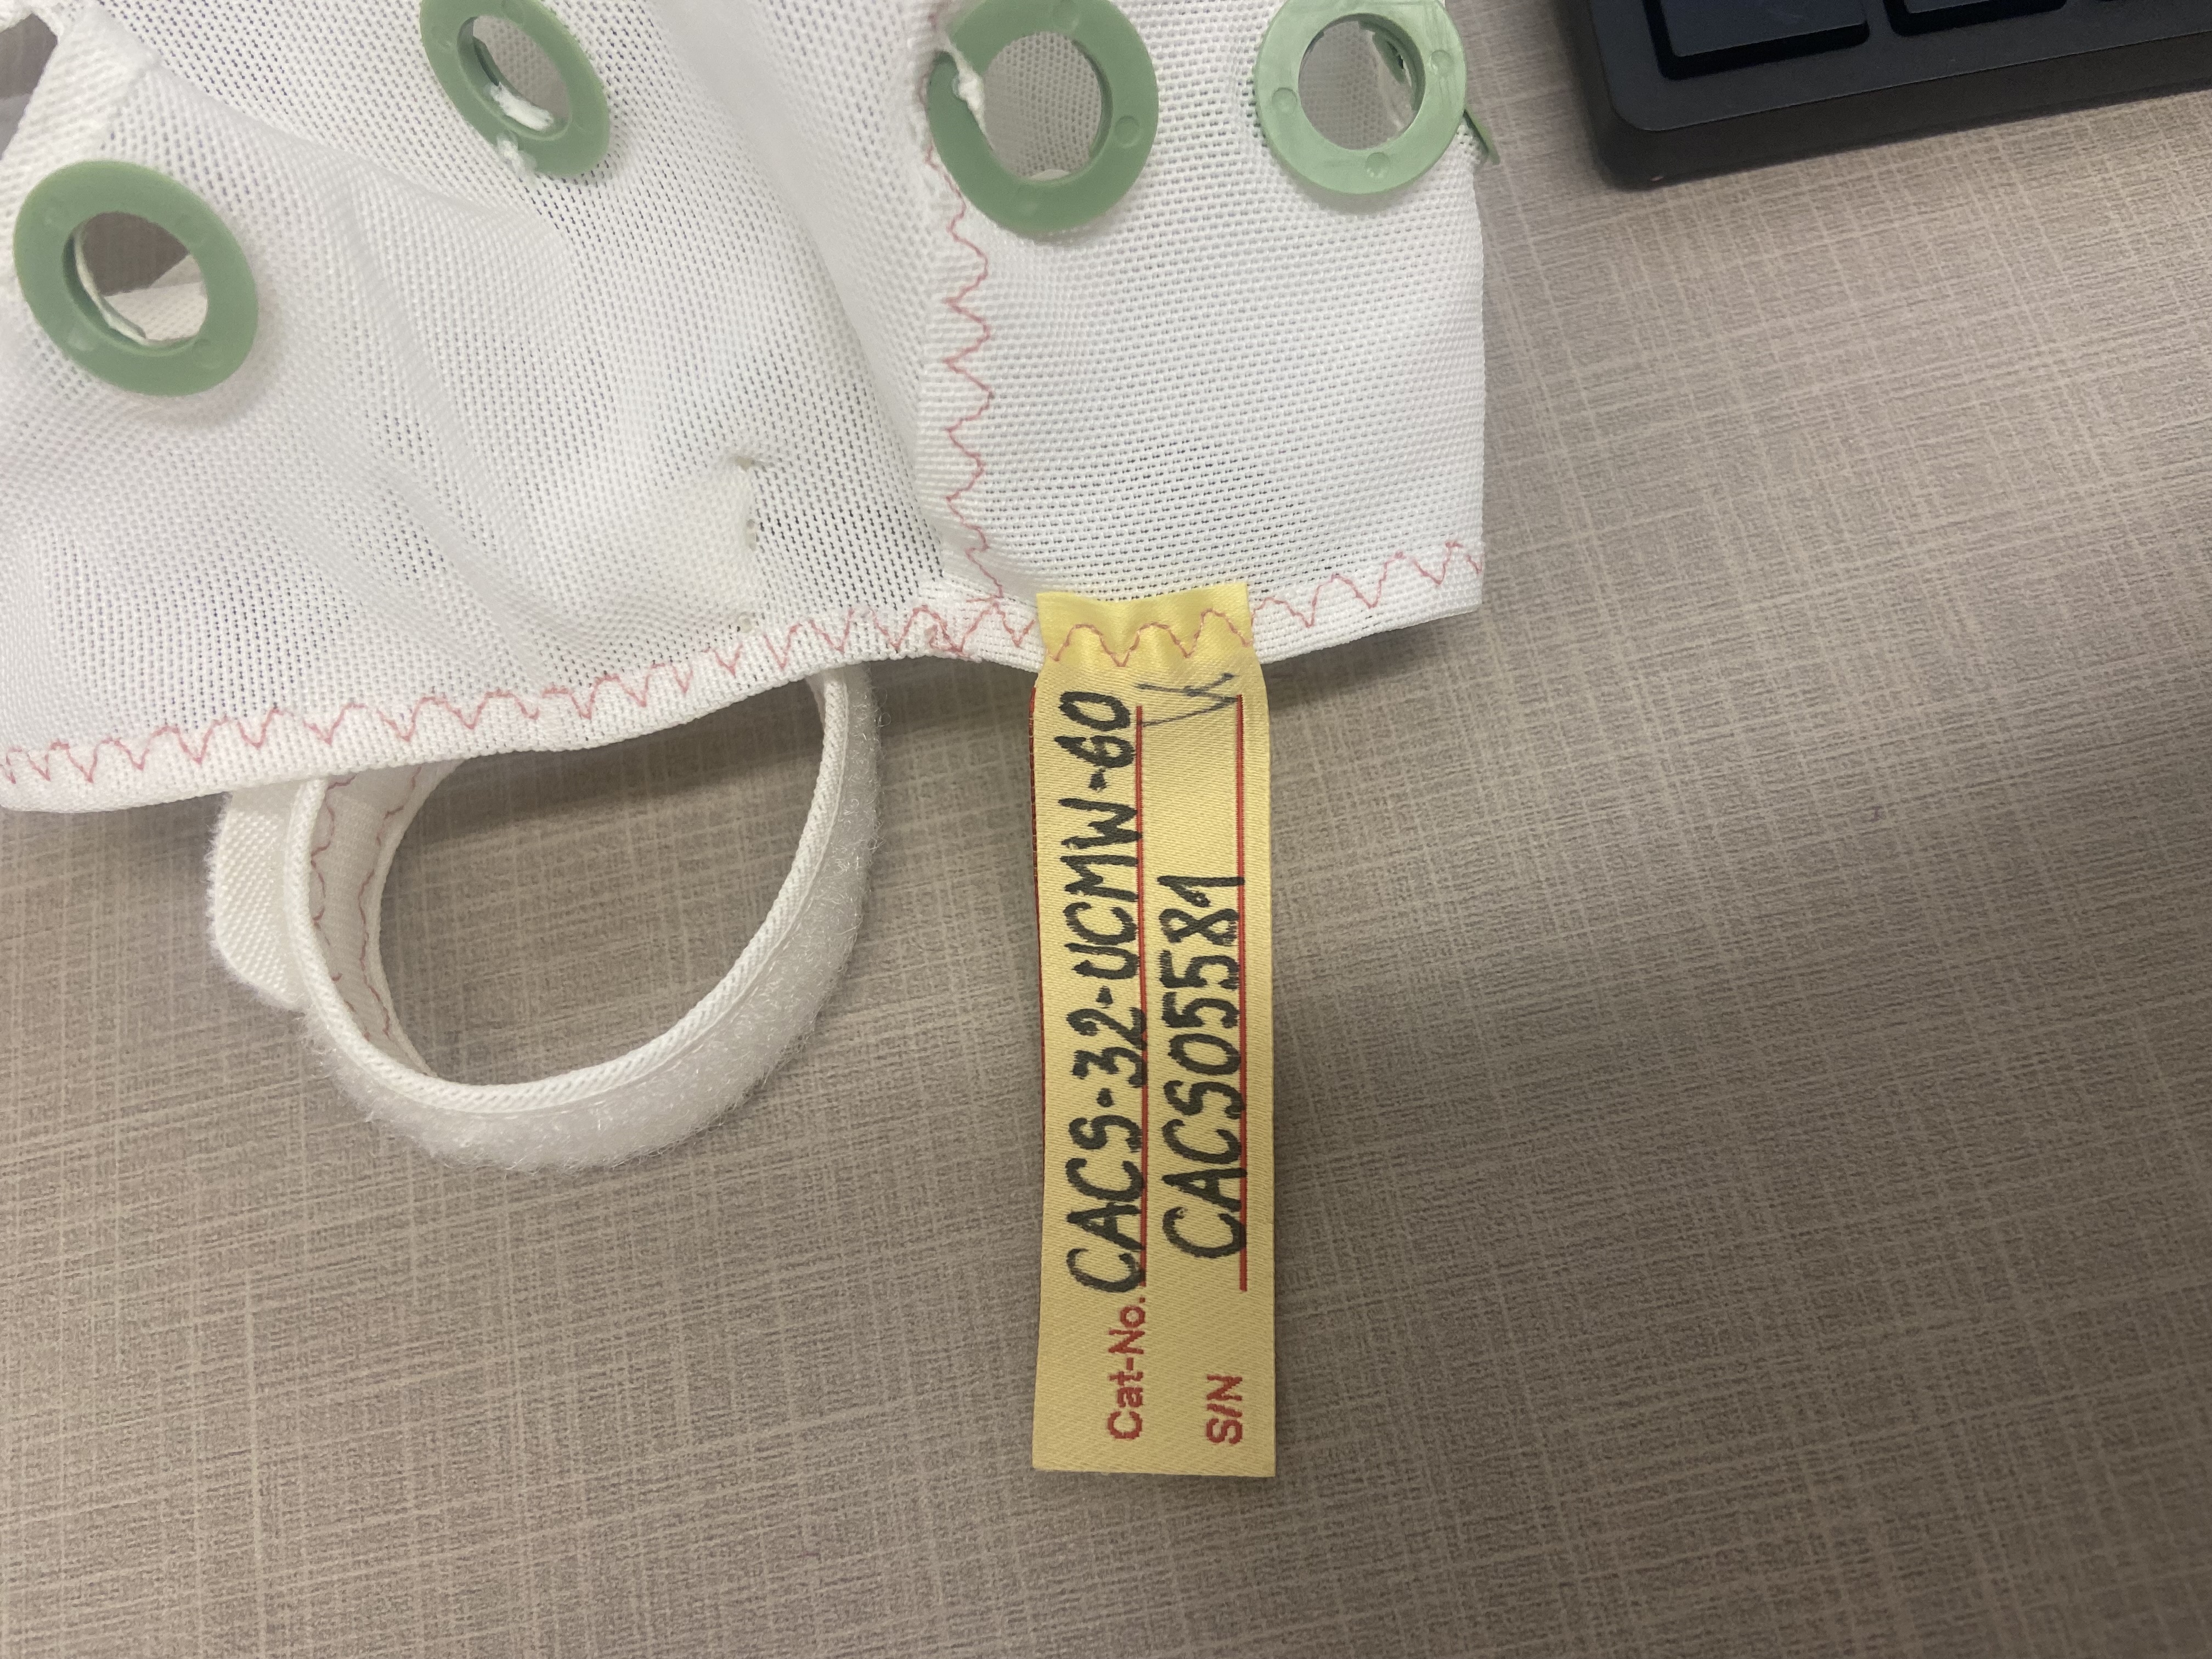
Look through the caps available in the supply closet. The size of the cap is listed in centimeters on the tag at the back of the cap. It is the last two numbers on the first line (Cat-No). We have four caps in the lab: 54cm, 56cm, 58cm, and 60cm. See reference photo of the 60cm cap below. Choose the cap size closest to the circumference measurement from step 2. If between sizes, have the participant try on both sizes and ask them which is more comfortable. Err on the side of the smaller size unless the participant is uncomfortable.
Once you have selected the correct cap size, ask the participant to try on the cap if they haven’t already. The easiest way to do this is to have the participant hold the ground electrode housing to their forehead while you pull the cap over their head. Make sure the cap is well fitted and the participant is comfortable.
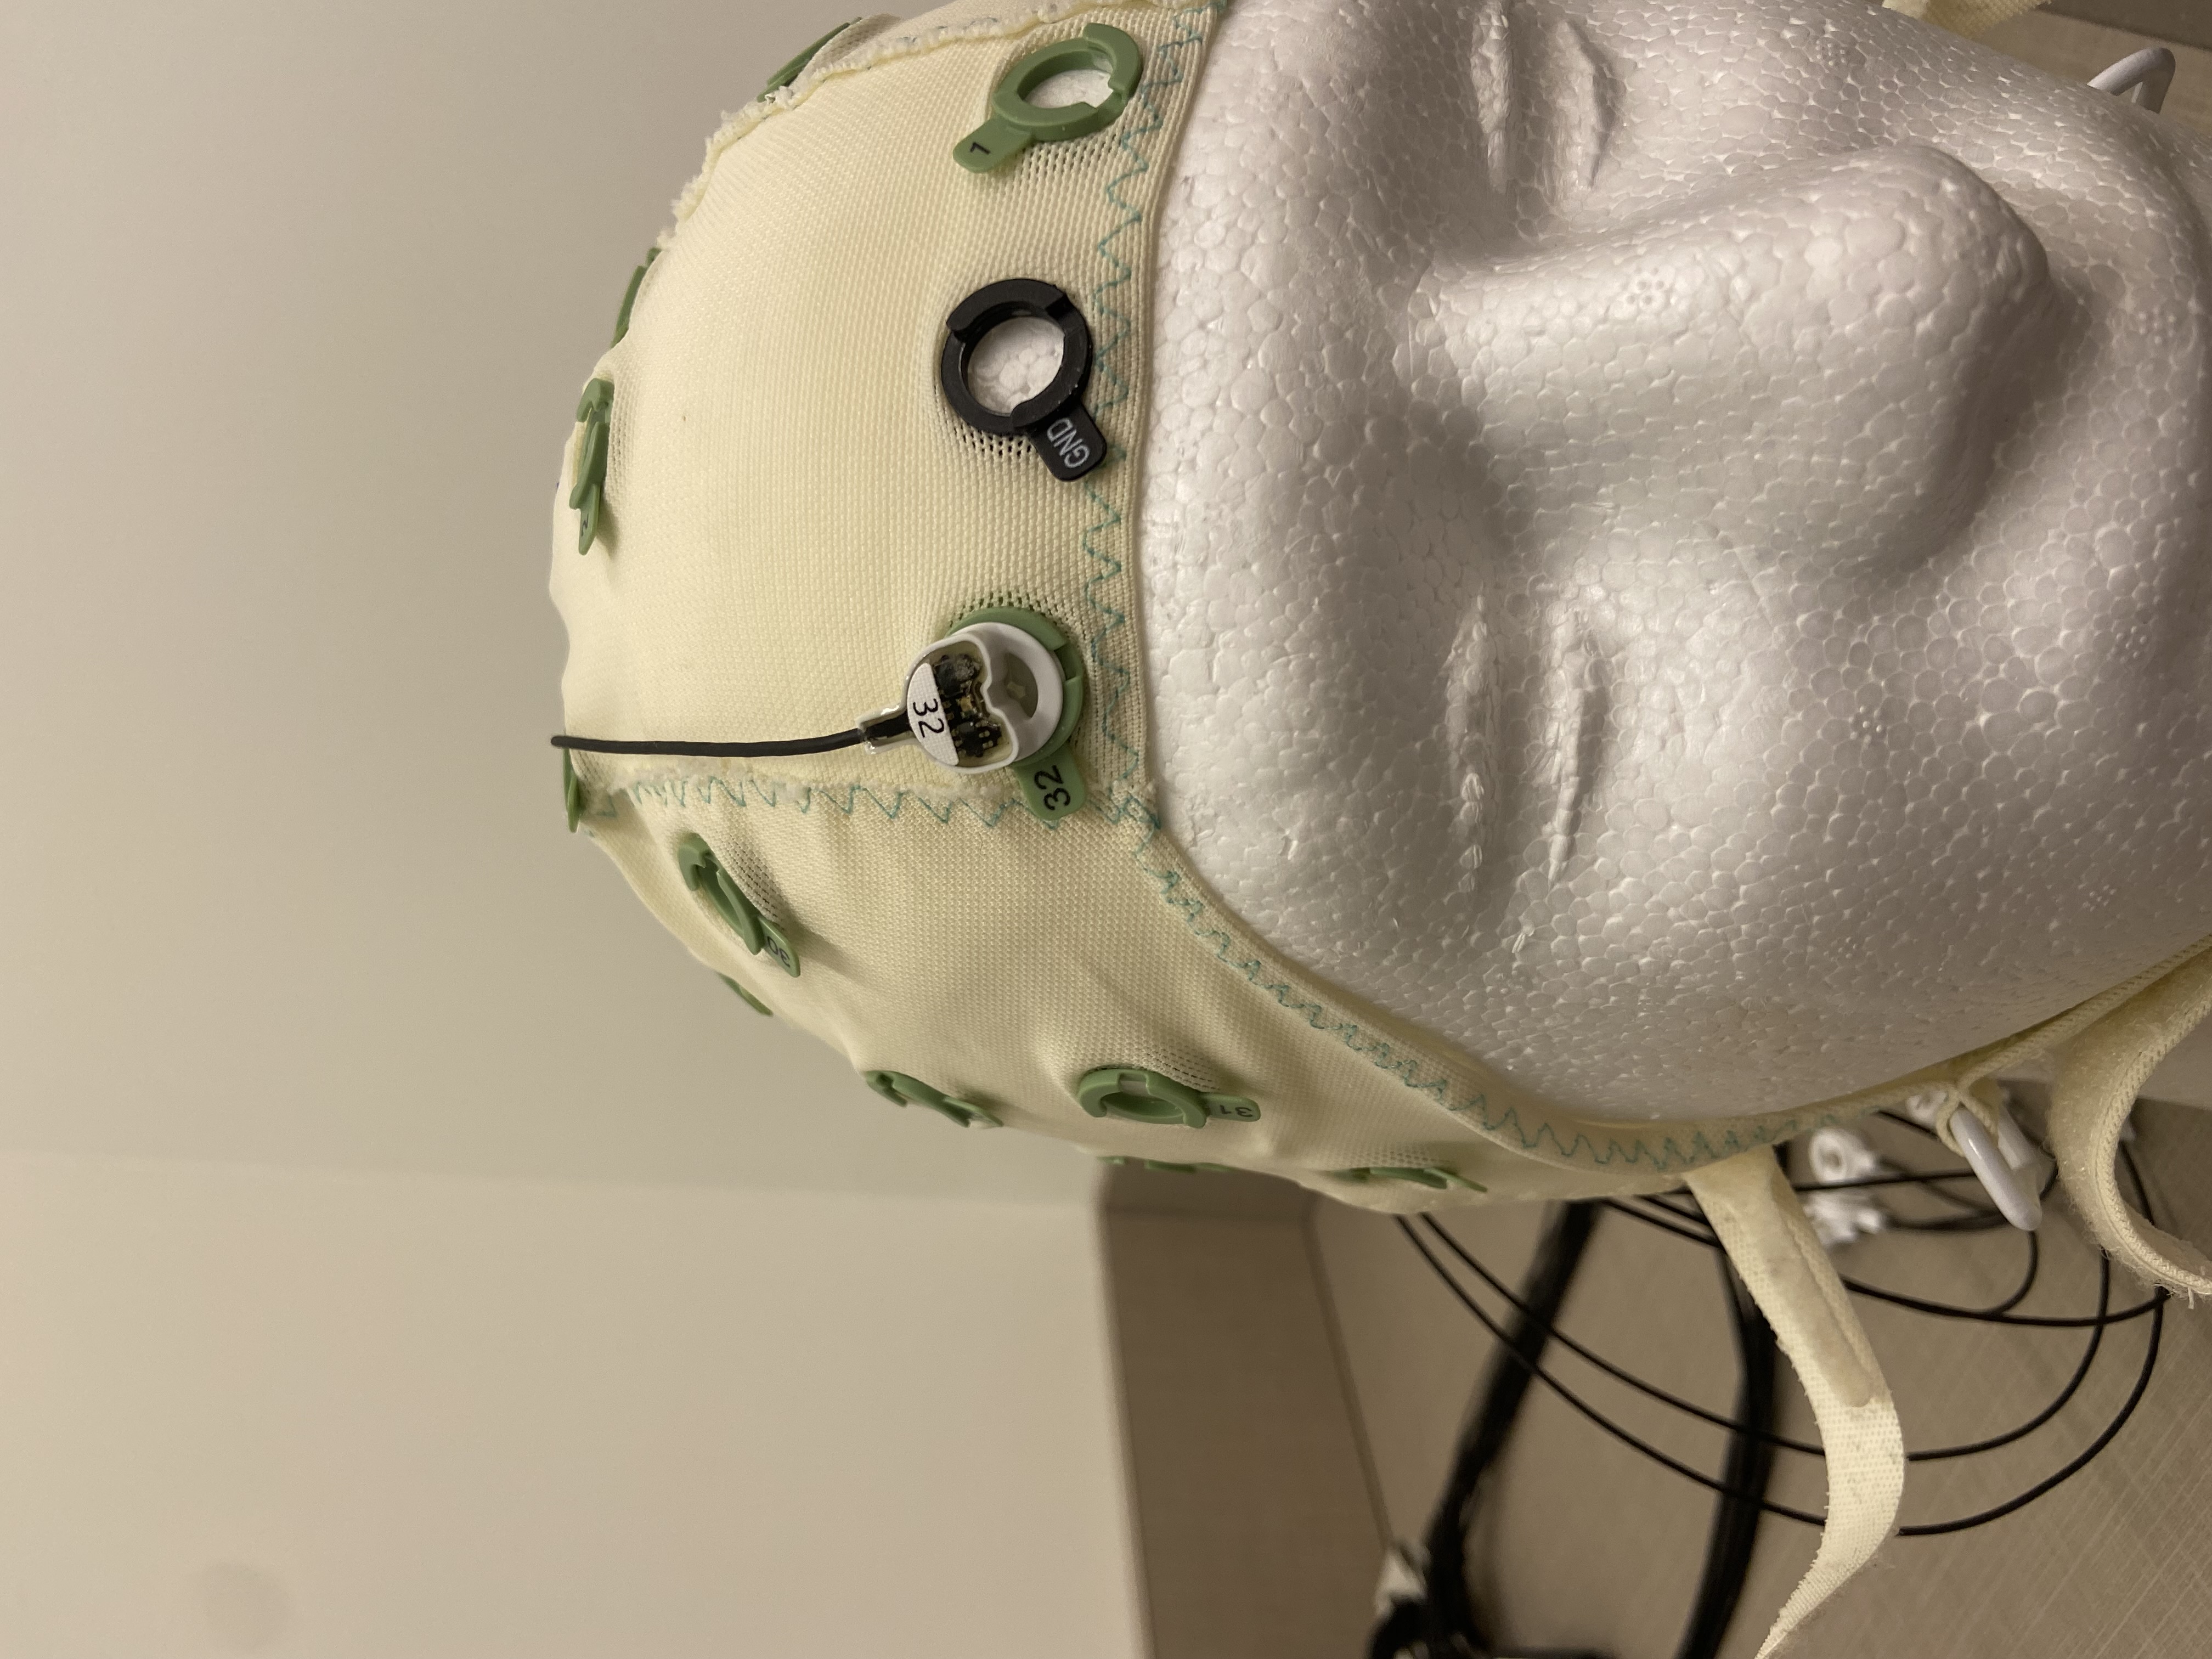
Once you have selected the correct cap and ensured proper fit, ask the participant to remove the cap once more so you can populate the cap with electrodes. The participant can now resume the rest of the Qualtrics questionnaire.
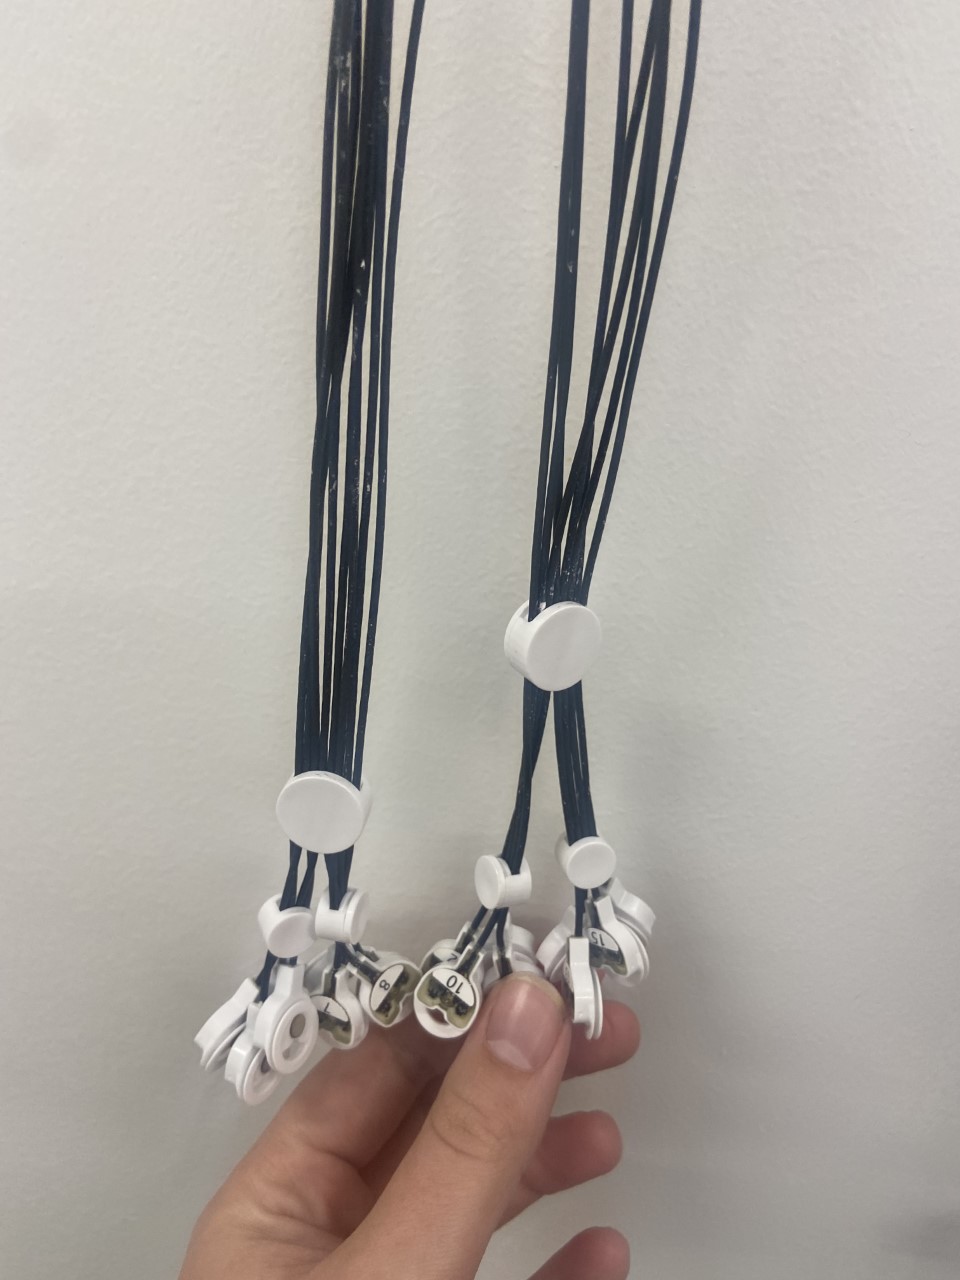
Please the cap over the mannequin head. Grab the electrodes from the designated hook shelf. Find electrode #1 and put that to your left side. Place the splitter box on your back and drape the electrodes over either shoulder. Sit down with the mannequin head in between your legs and begin sliding the electrodes into place.
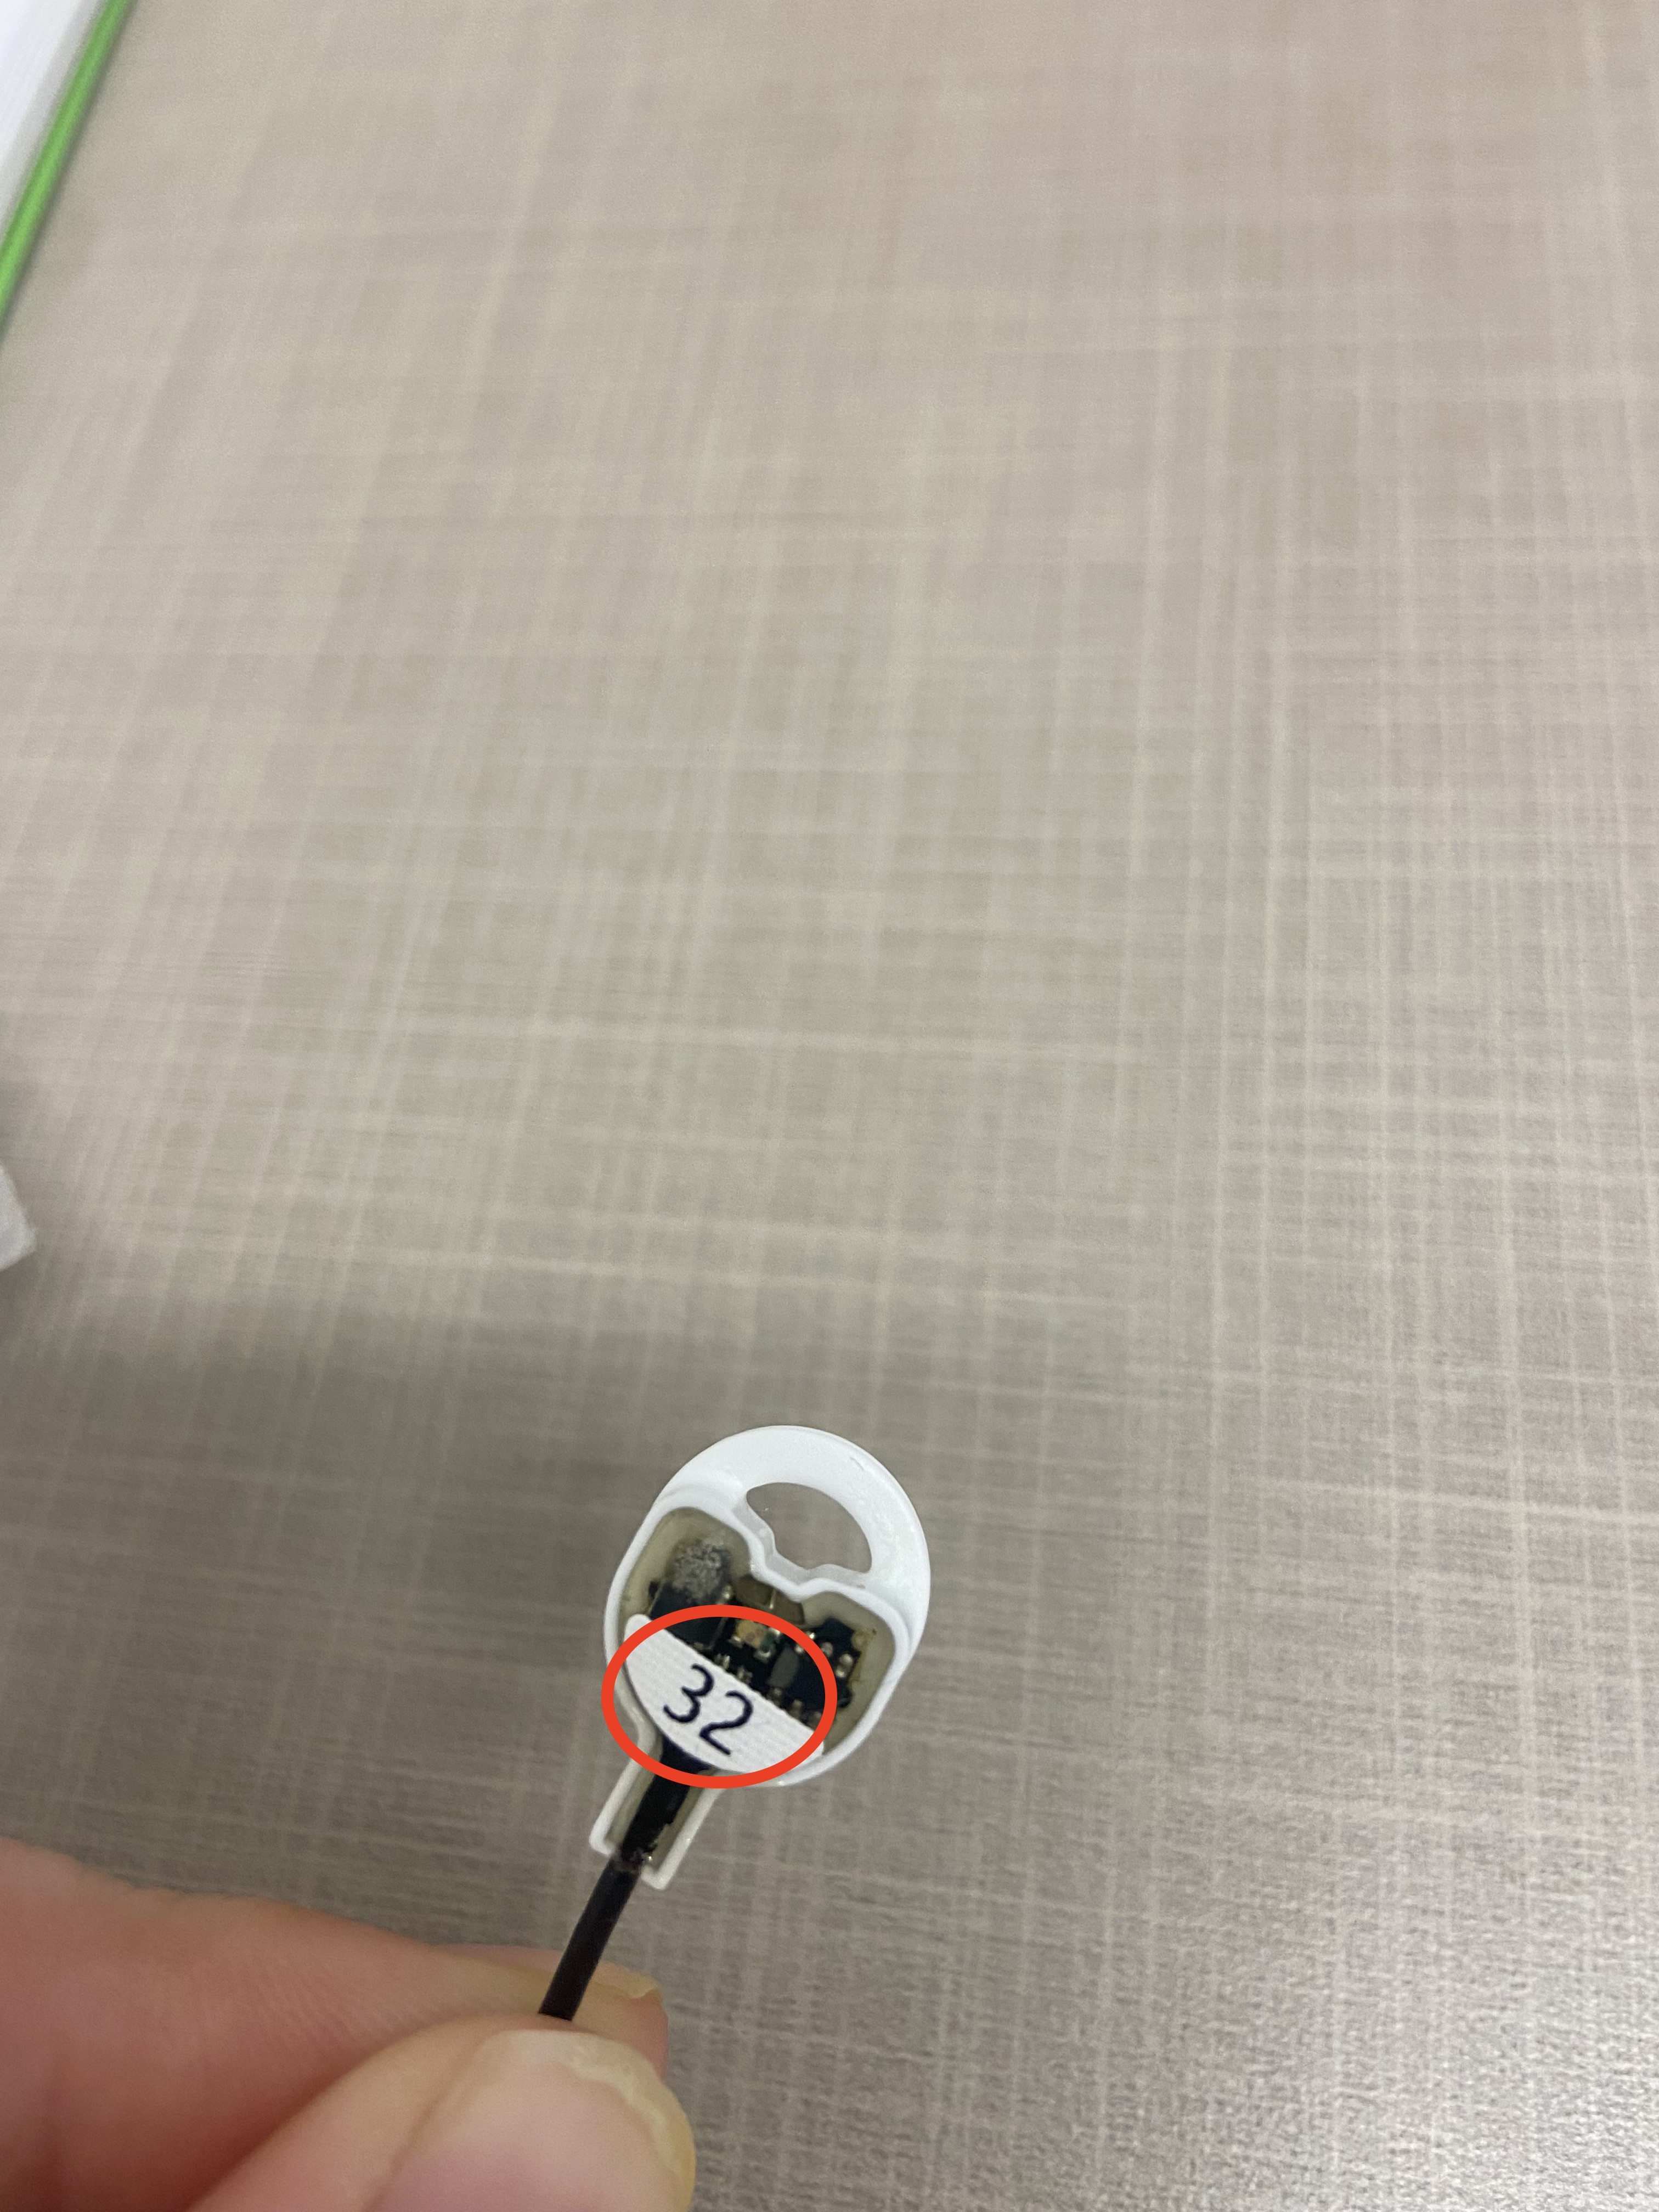
- Pick an electrode and identify the electrode number (printed on the top of the electrode)
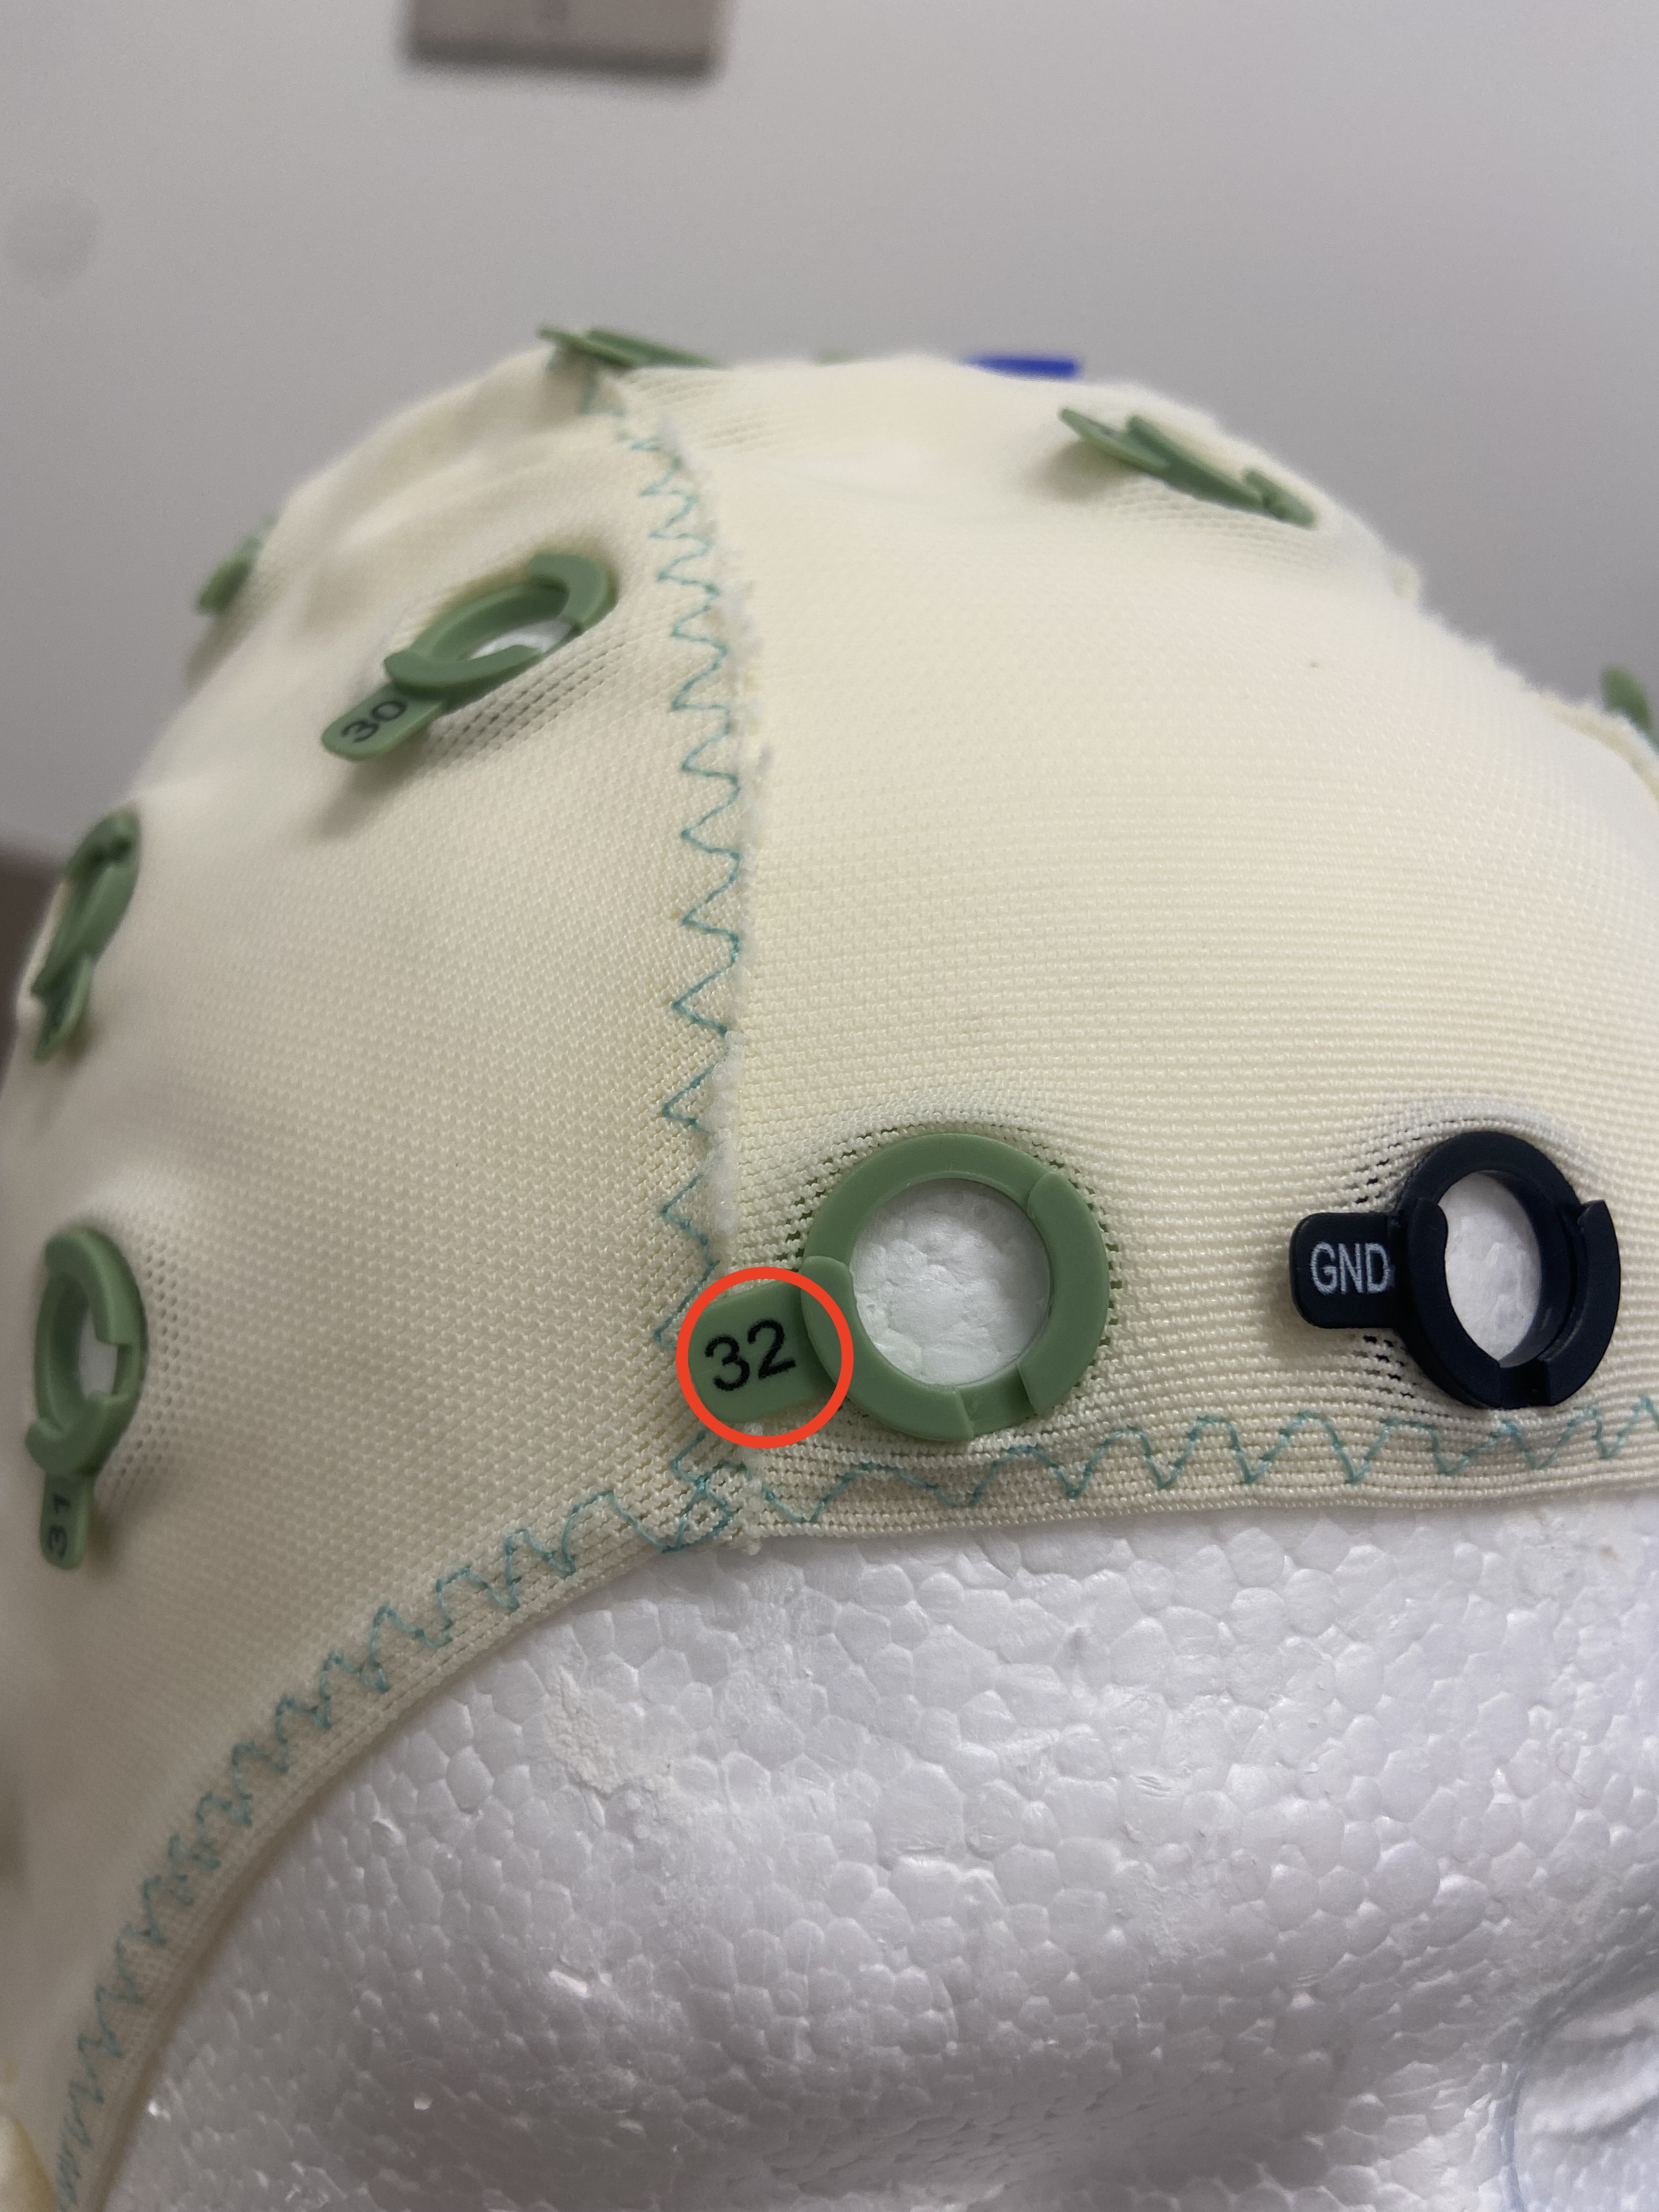
- Find the corresponding number on the cap
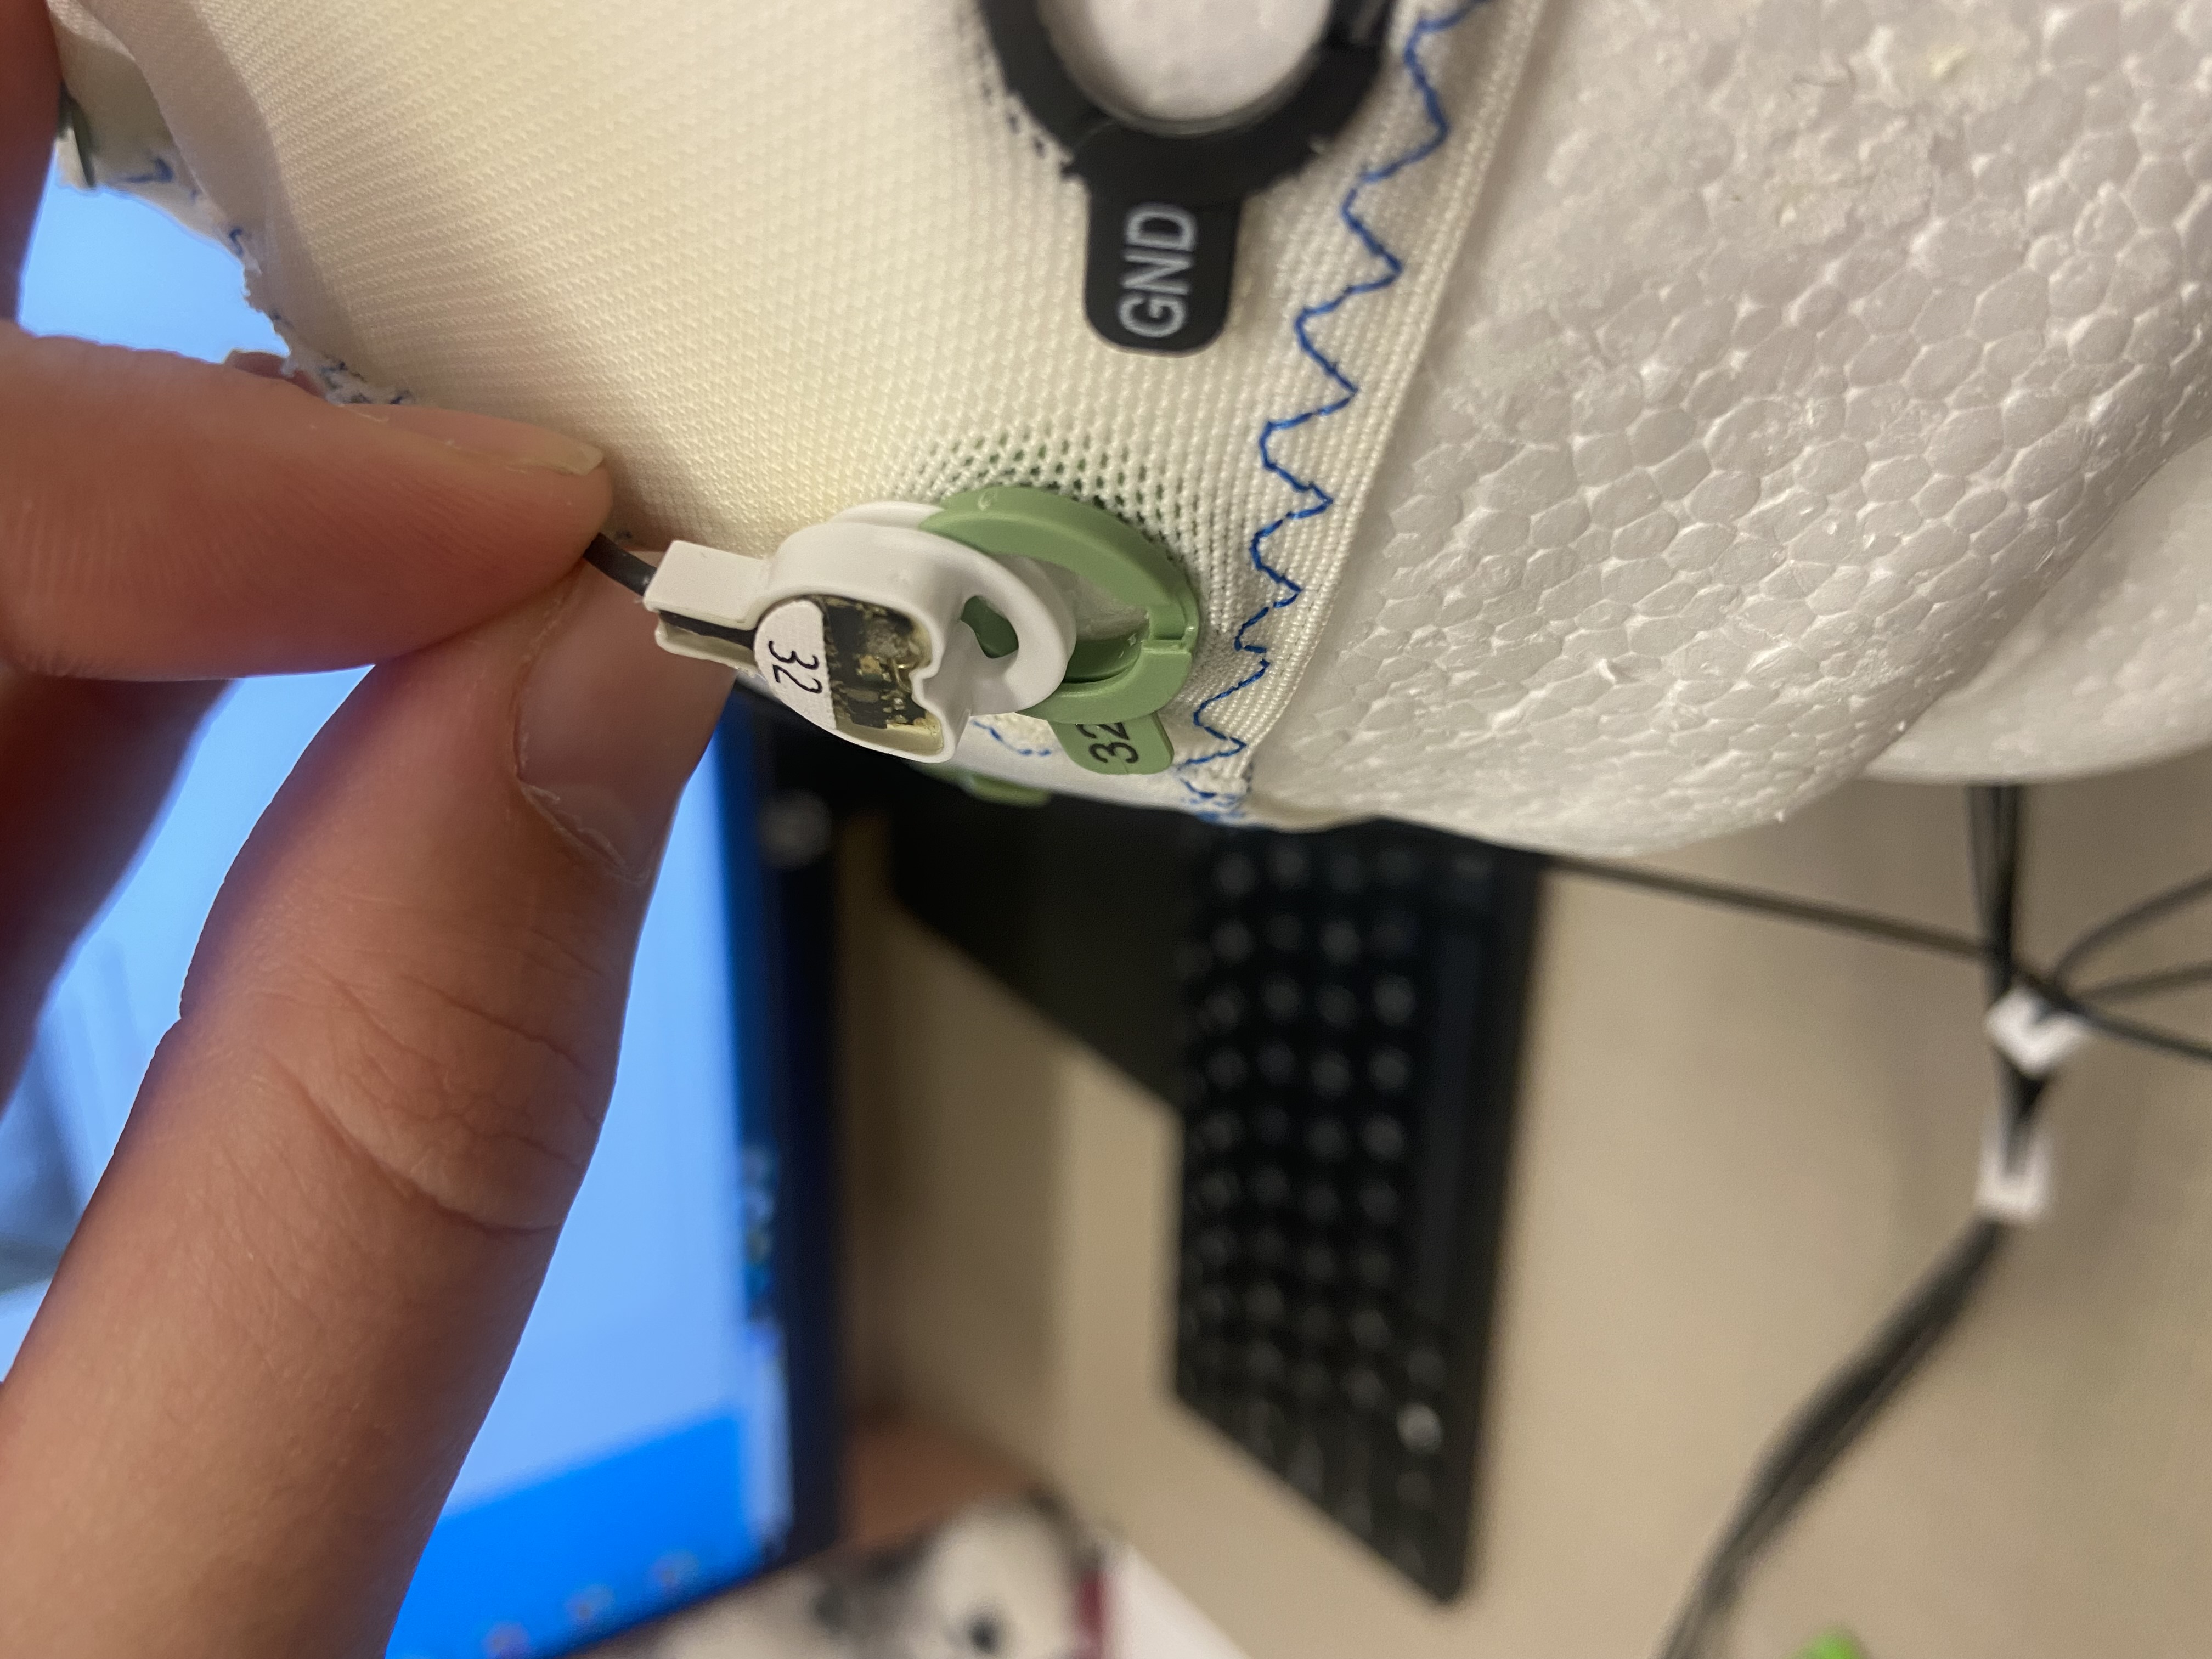
- Slide the electrode into the electrode base
- Push to make sure the electrode is securely in the housing. Make sure the cord is going straight towards the back of the head. You can twist / turn the electrode housing if needed:
- Continue until all electrodes are in the correct place. You may need to slide down the white cord control buttons to allow each electrode to reach their housing.
- Pick an electrode and identify the electrode number (printed on the top of the electrode)
Wait for the participant to complete the Qualtrics questionairre. Return to the experimental room and place the mannequin head, cap, and electrodes on the desk.
Administer the TOWRE assessment. Read the instructions highlighted in blue from the laminated sheet. Use your phone to set a 45 second timer and use the lab iPad to record the assessment.
Next, help the participant put on the black cape (kept in the supply closet). This prevents gel from getting on their clothes or the chair. Have them sit in front of the computer if they are not there already.
Grab a sterile alcohol prep wipe (top rack of the black supplies cart) and wipe down the participant’s forehead.
Now it’s time to collect your second measurement. Measure from the nasion to the inion going over the top of the head.
Use one of the colored pencils to mark 10% of this measurement (nasion to inion) above the nasion on the forehead. This mark will be your guideline to make sure the cap is correctly positioned on the participant’s head, so make sure the mark is large enough to see through the ground electrode housing.
- example: if you measure 35 cm from the nasion to the inion, you’ll want to put a mark 3.5cm (10% of 35cm) above the nasion on the participant’s forehead.
Help the participant put on the cap once more. Make sure the red line is visible through the ground electrode opening on the cap (labeled ‘GND’, front and center on the cap). Ensure the cap is symmetrical on the participant and there are no air bubbles. Pull the tag out of the back of the cap so it does not interfere with the electrodes.
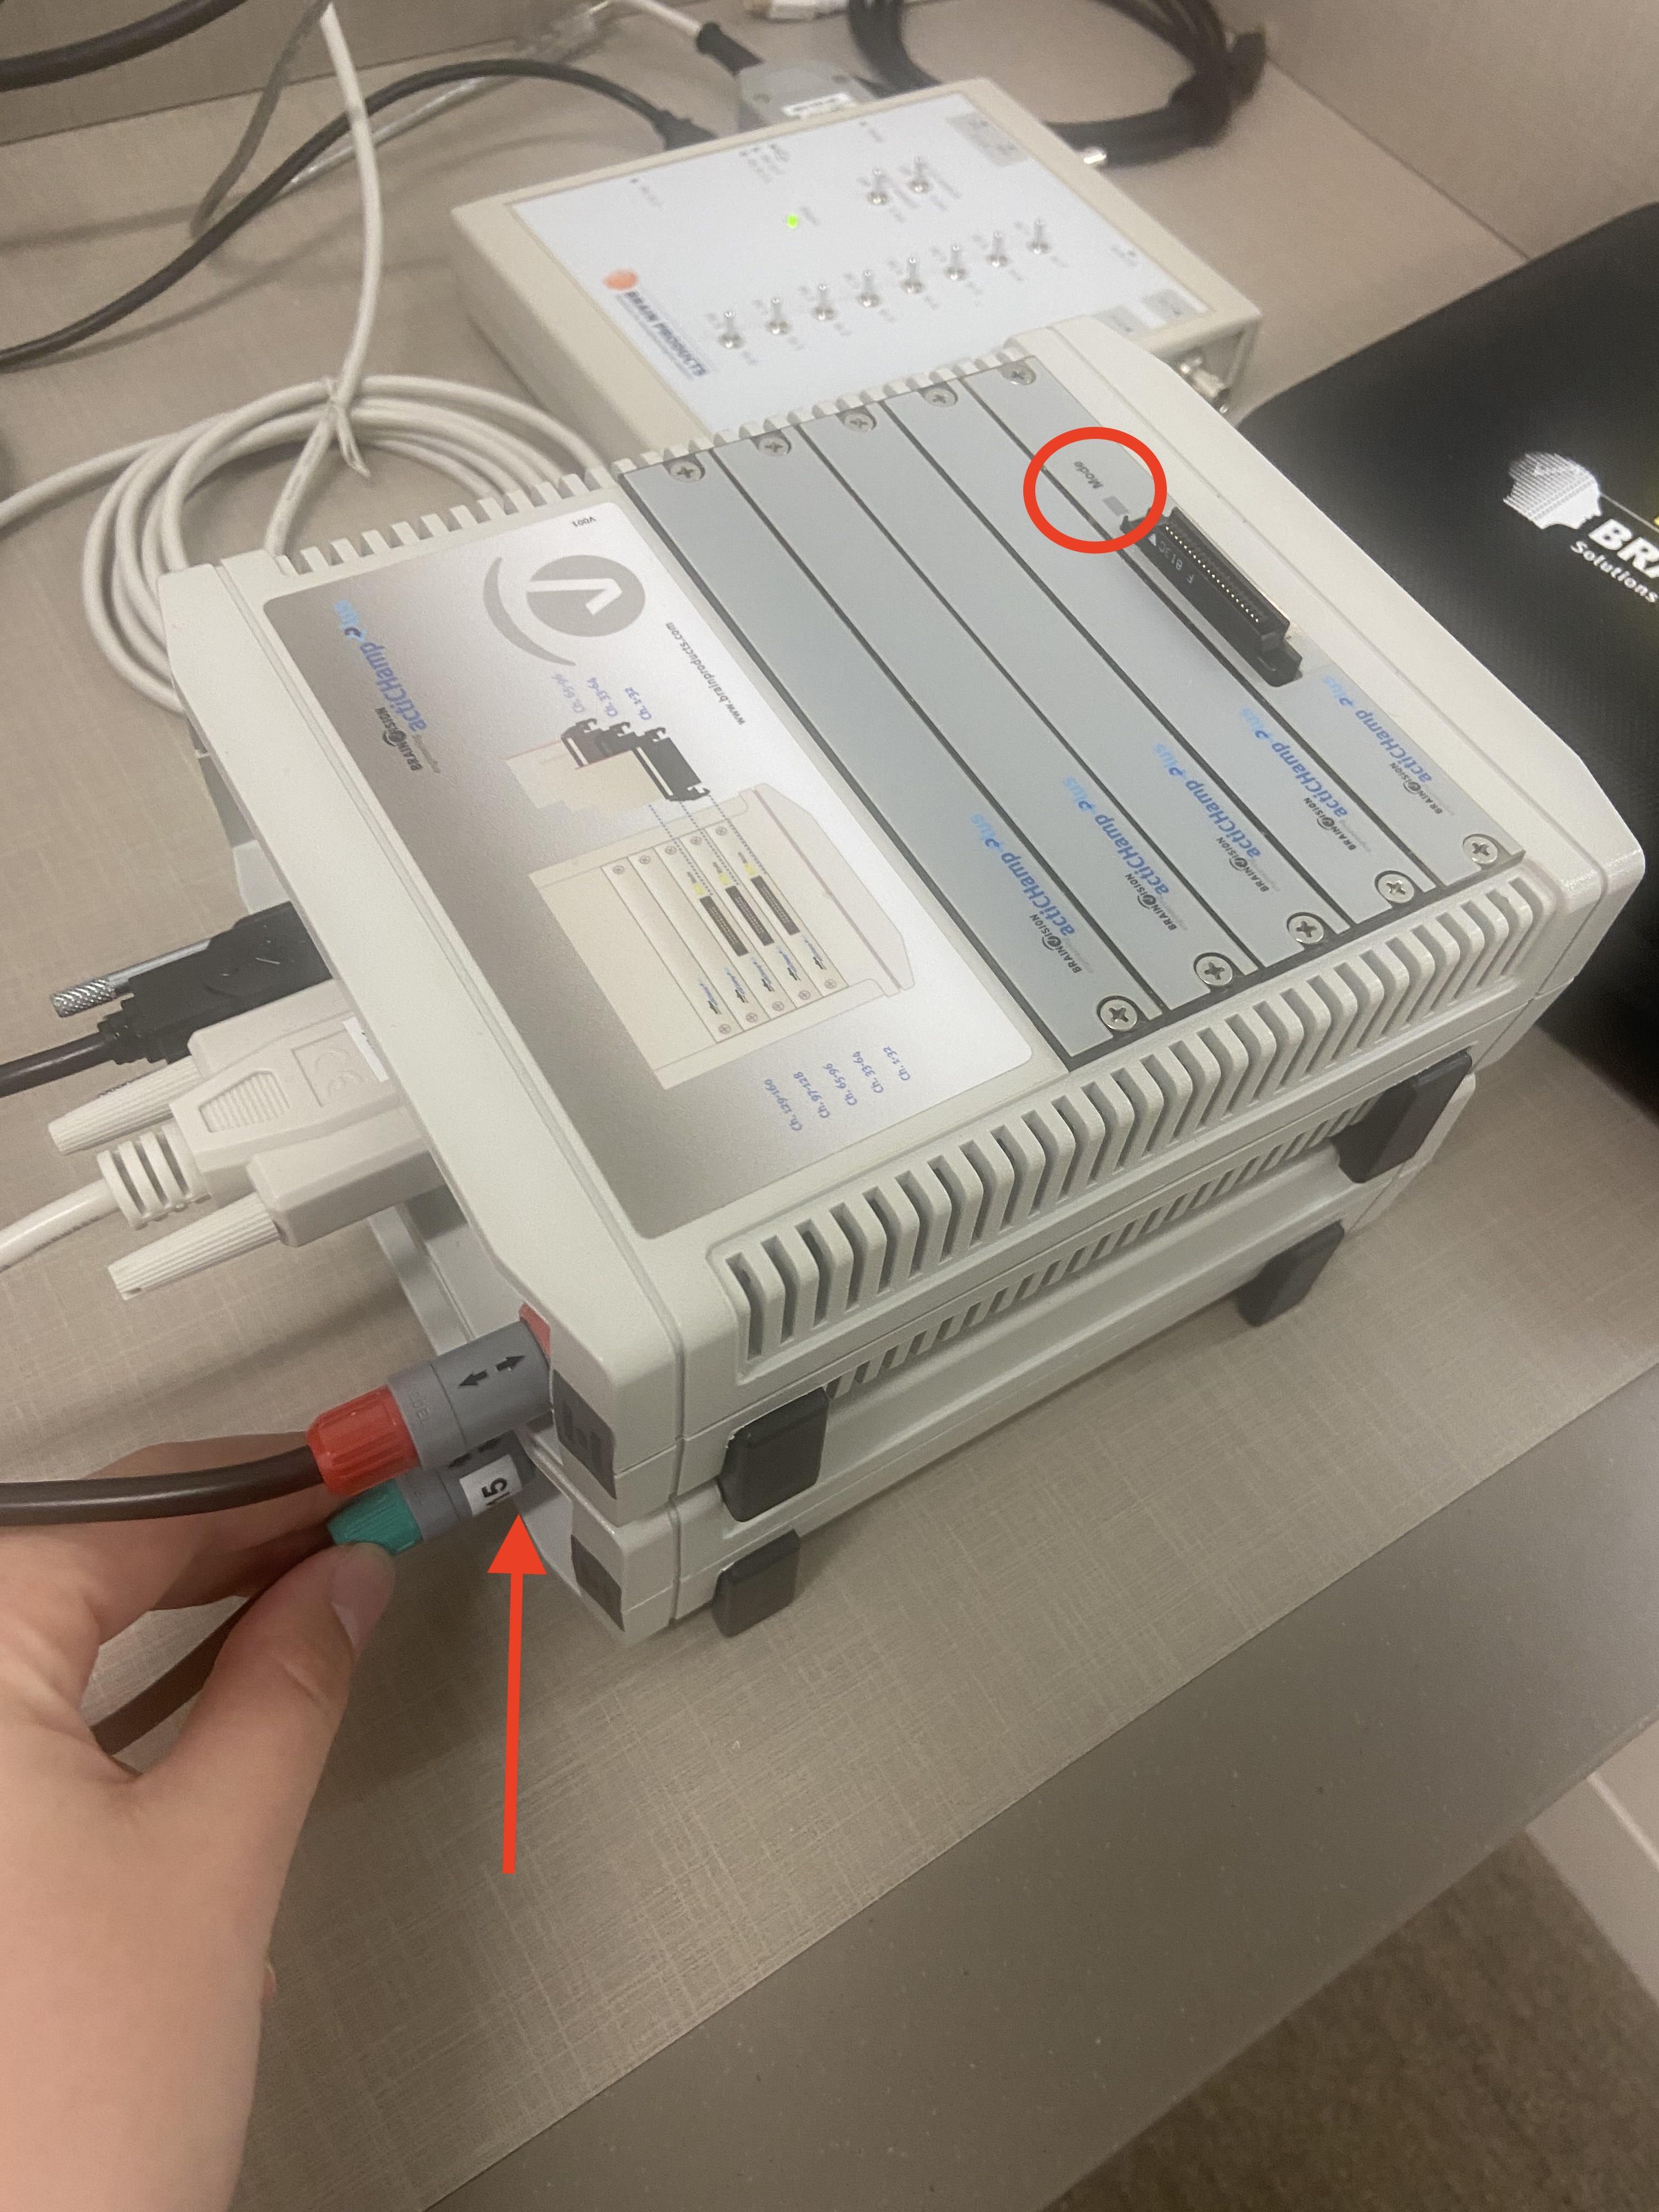
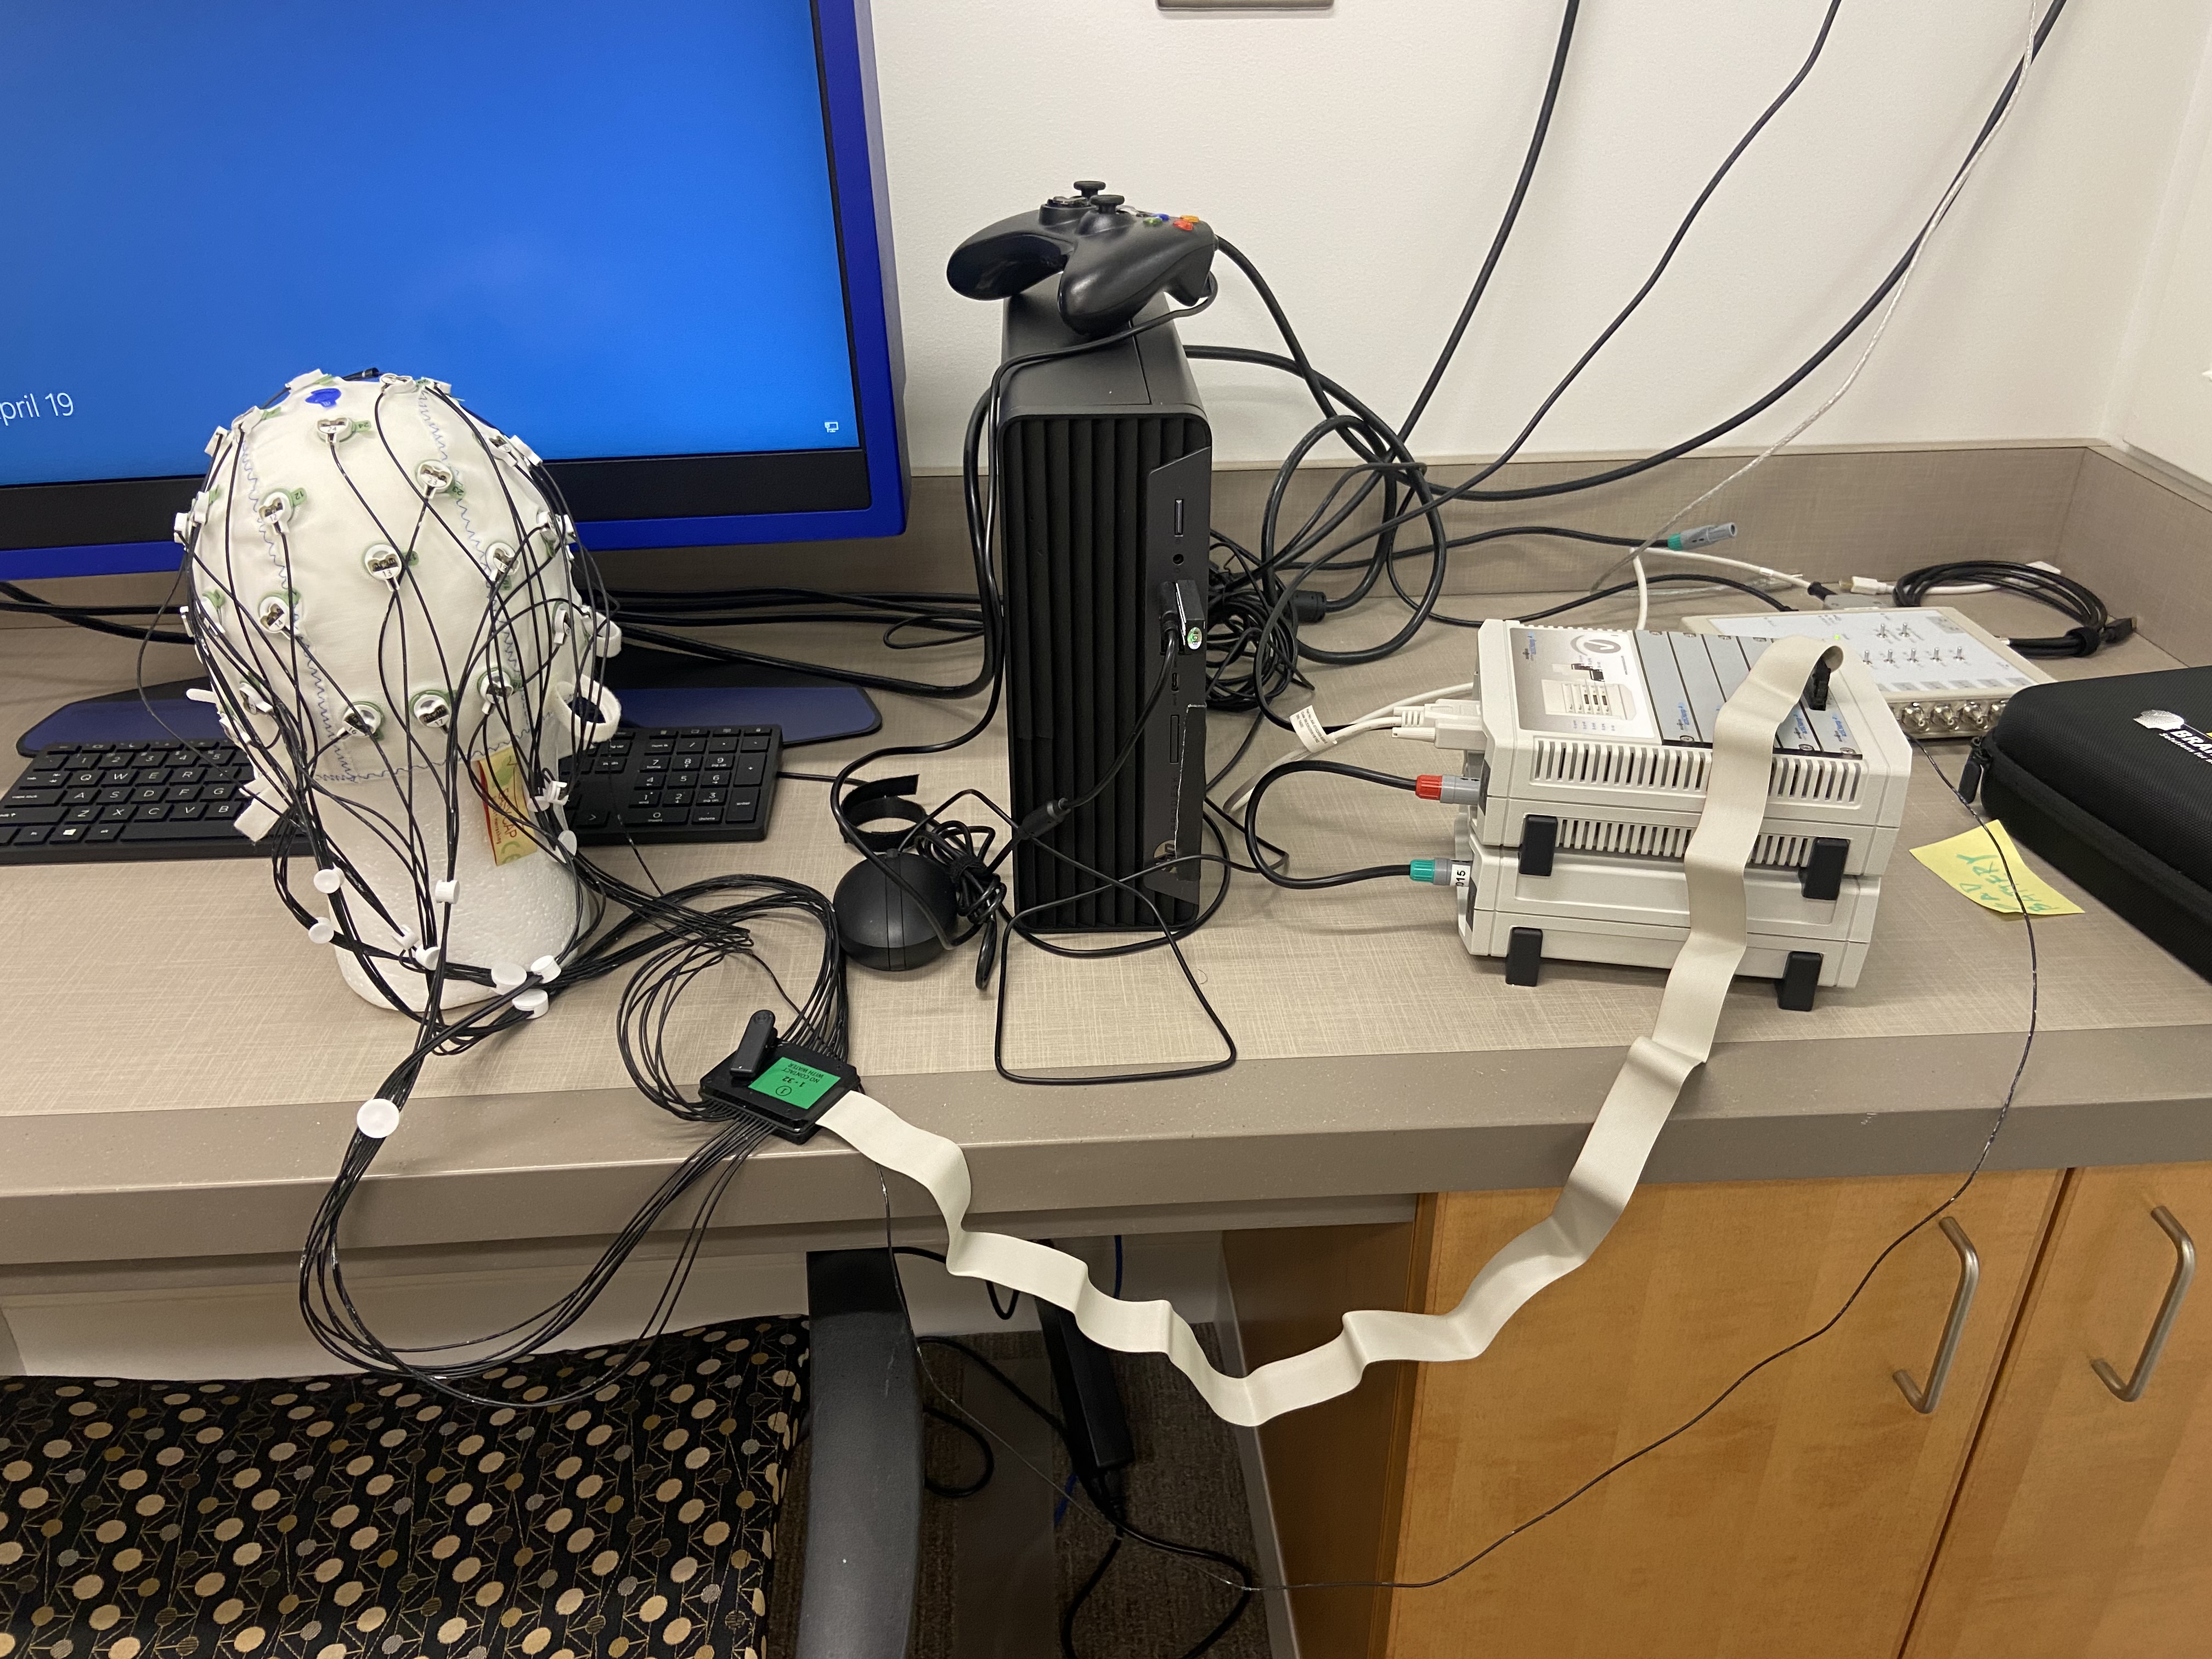
Now it is time to plug in the actiCHamp system. Take the green side of the cord and connect the actiCHamp to it’s battery pack. Make sure the mode indicator flashes red to indicate it is plugged in correctly.
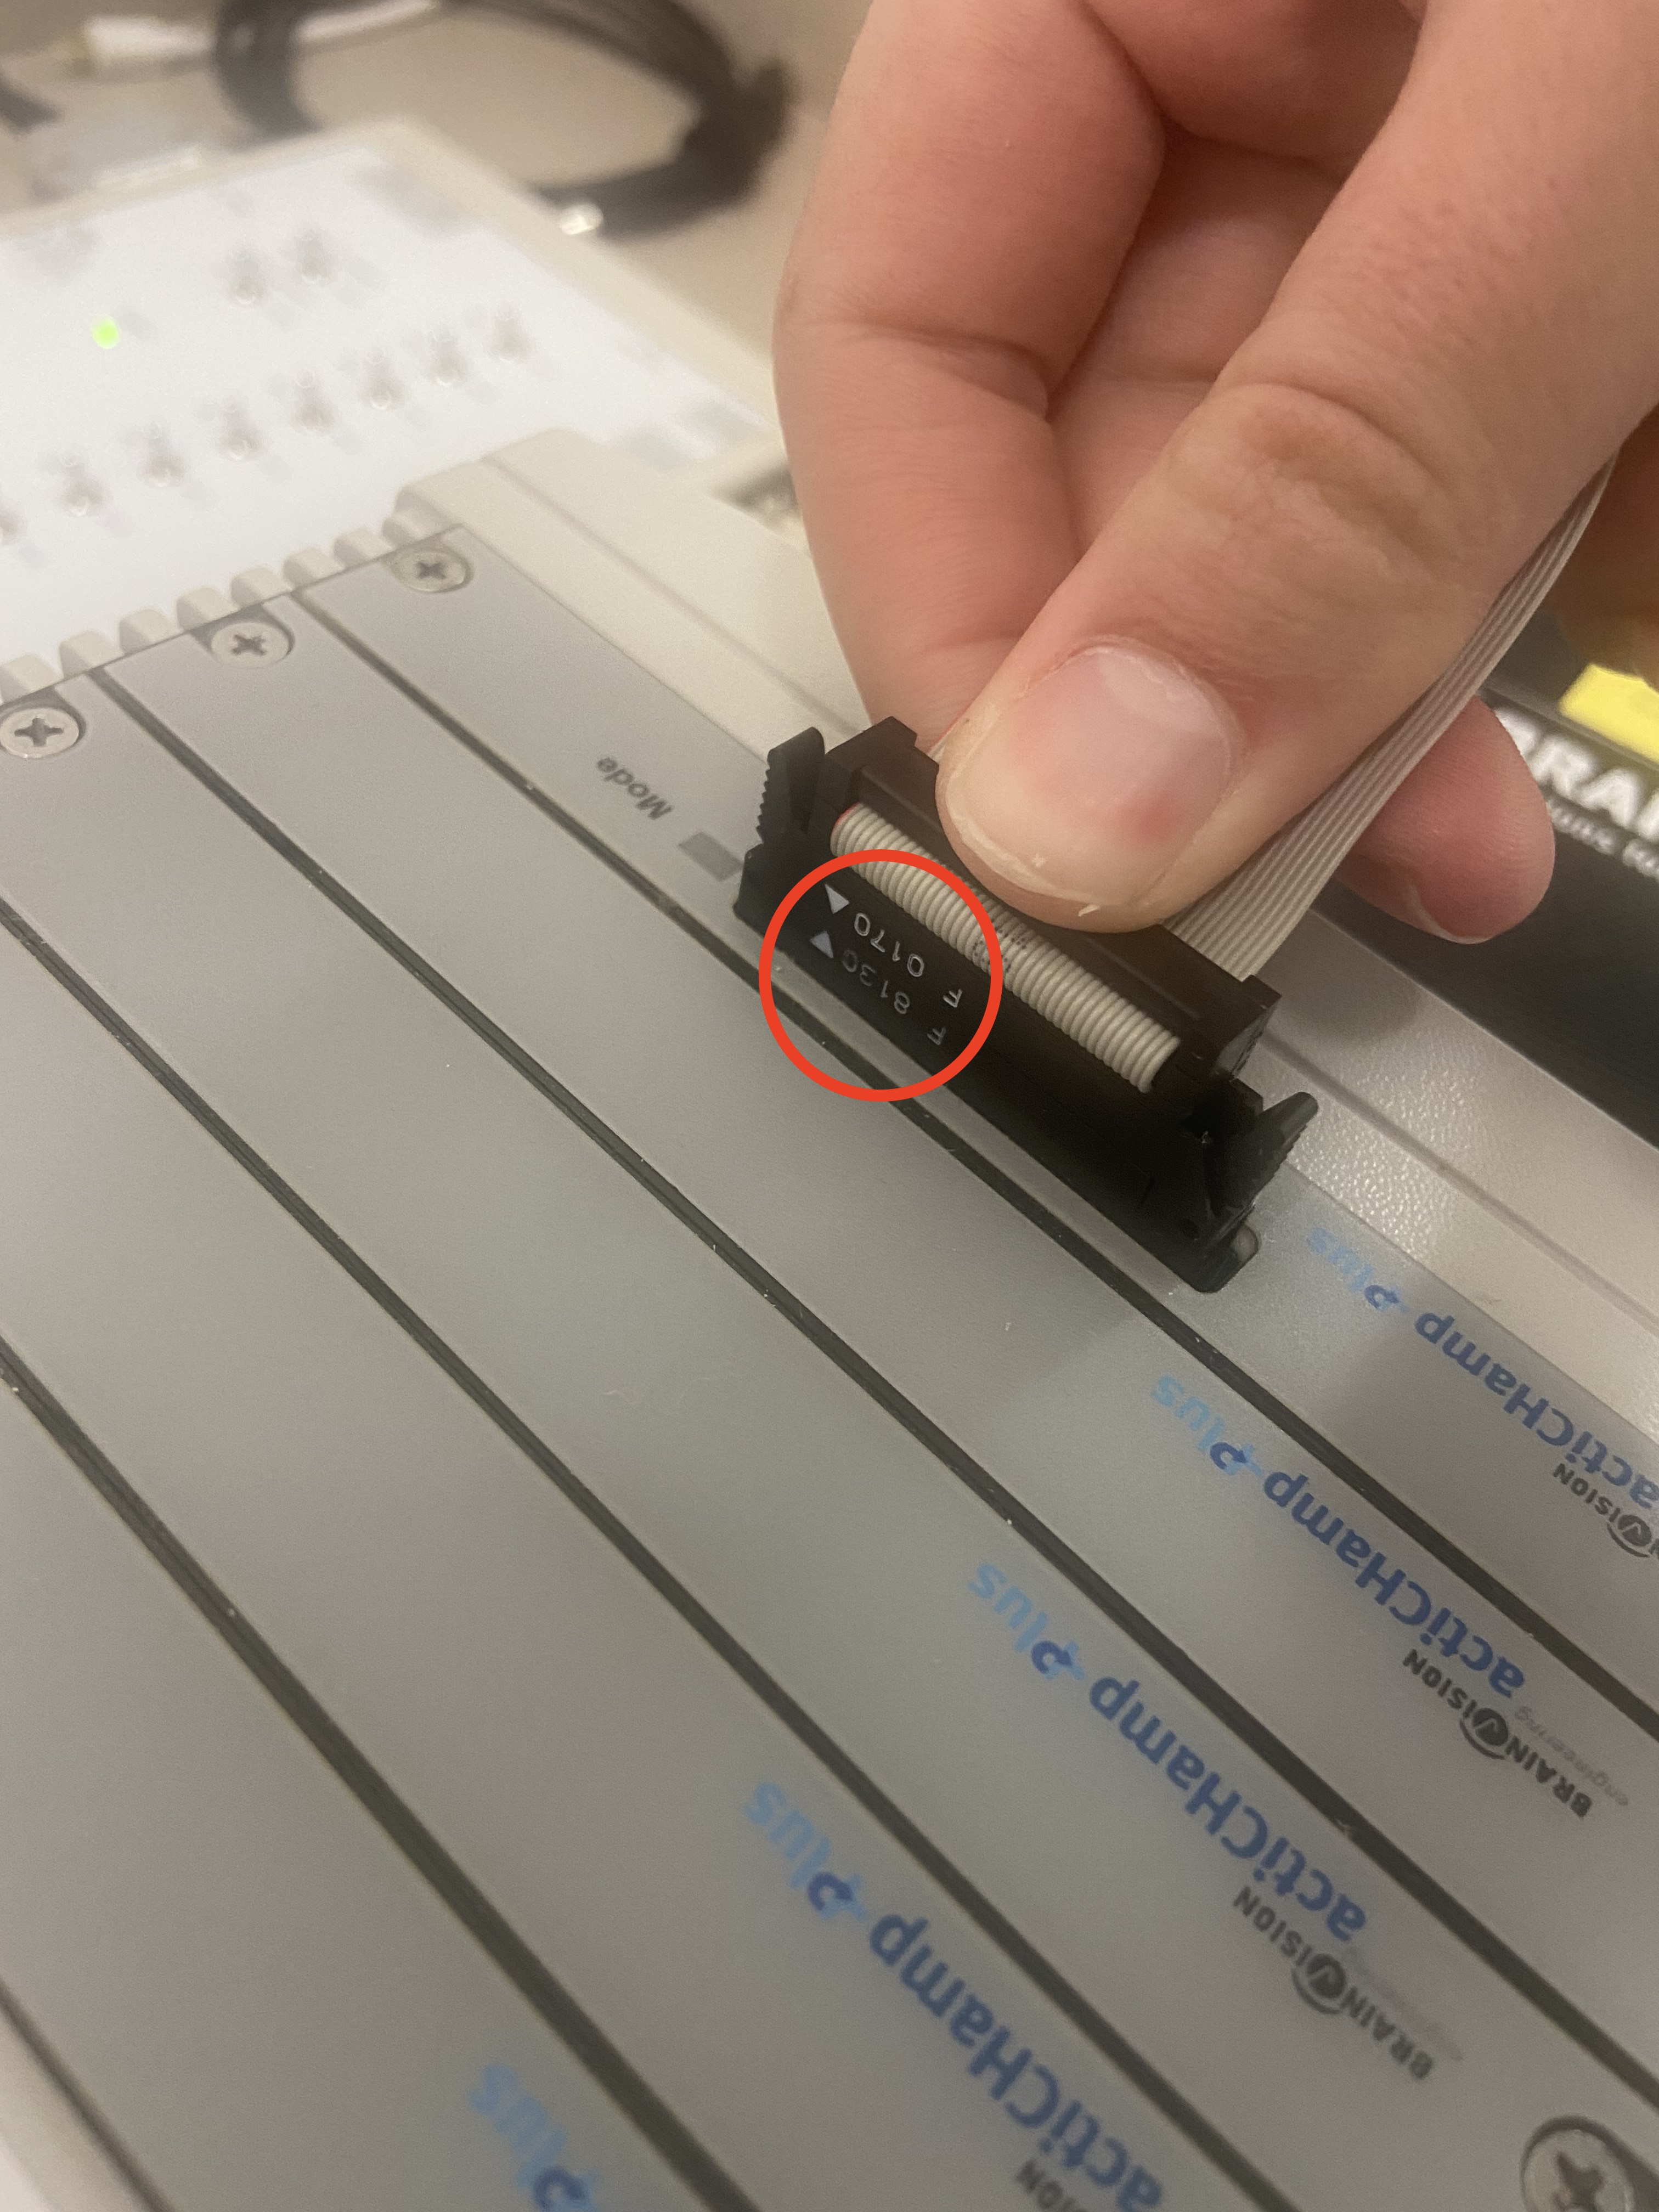
Next, unravel the belt from the electrode splitter (back of the EEG setup) and attach it to the actiCHamp. The numbers should face each other and it should click into place:
Take the ground electrode from the designated shelf. Connect the ground electrode to the system and then to the EEG cap.


Here’s what your final set up should look like:
- {width="502"}
*Please note that the cap should be on the participant at this point, not on the mannequin!*Once everything is plugged in, make sure the participant is comfortable then go back into the control room and open the BrainVision Recorder program on the computer.
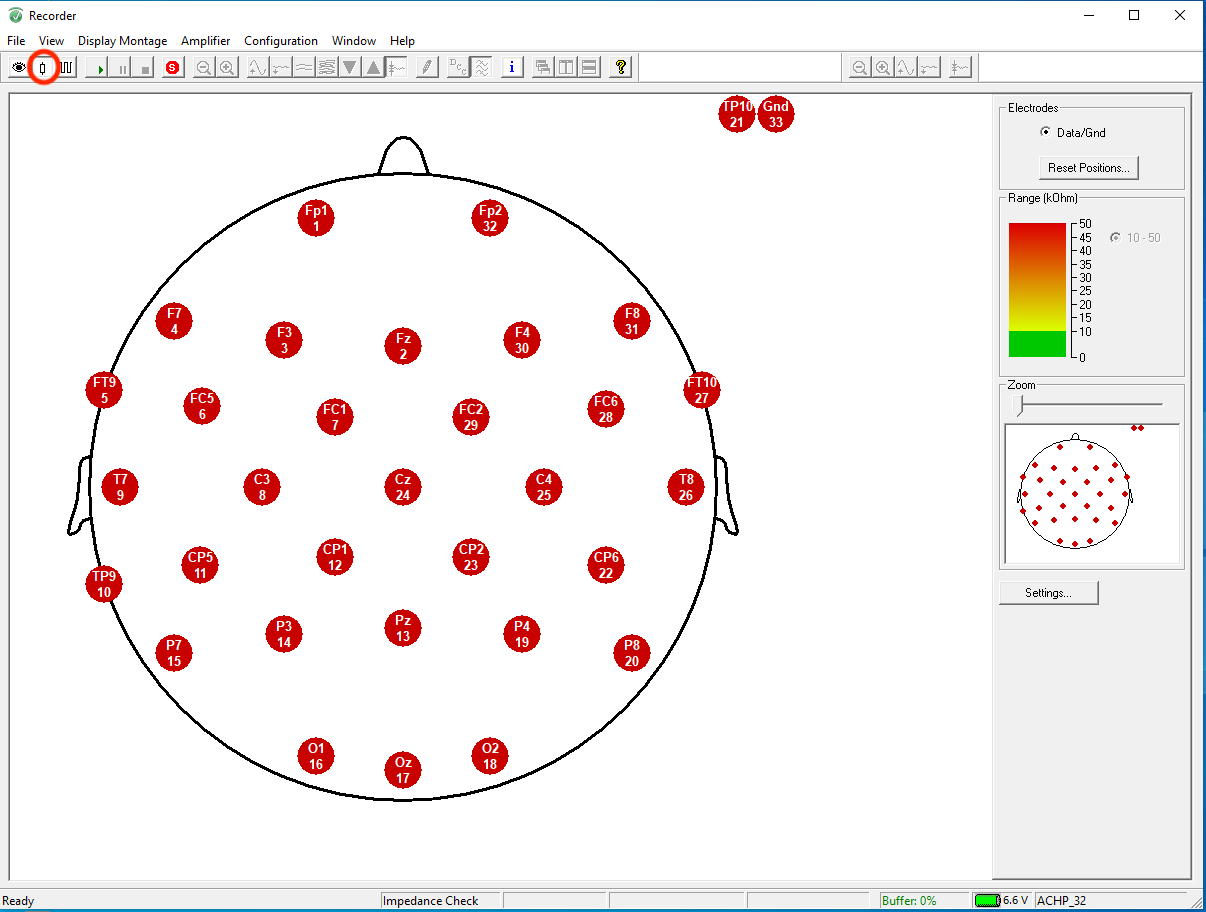
Click on the eye icon in the upper left corner of the program to start monitoring. There will be very little waves, if any since you have not gelled the participant yet. Your page should look like so:
Confirm the battery level and work space. Both of these items are shown in the bottom right corner of the BrainVision window. Battery level should be above 5amps and the work space should be “ACHP_32”
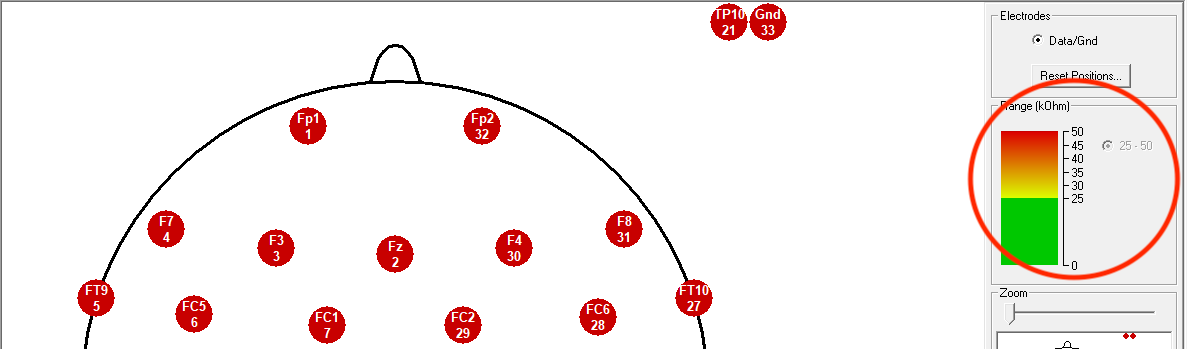
Click on the button directly to the right of the eye icon to start the impedance check. You should see a diagram of the EEG and all electrodes should be red to start.
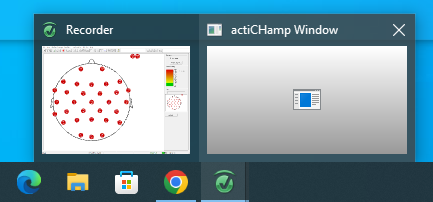
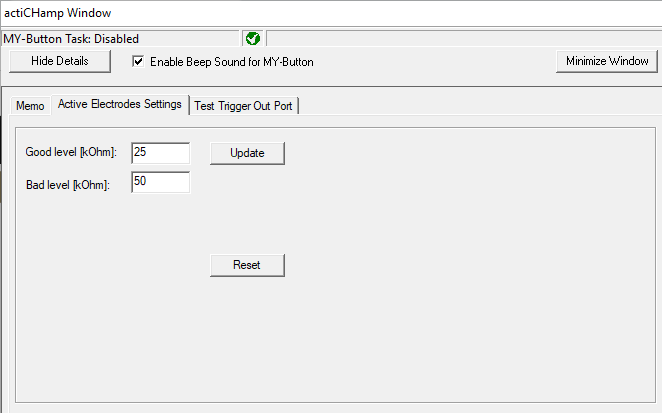
Next, you will want to reset the control levels to the right of the screen. We want ‘good’ levels to start at 25 kOhms. This will make it easier to activate the cap. To change the levels, hover over the BrainVision icon along the bottom of your screen and click to open the second browser window (actiCHamp Window):
In the new window, adjust the Good Level [kOhm] to 25. Click Update to save:
Check to make sure the graph and numbers have updated on the right side of your screen:
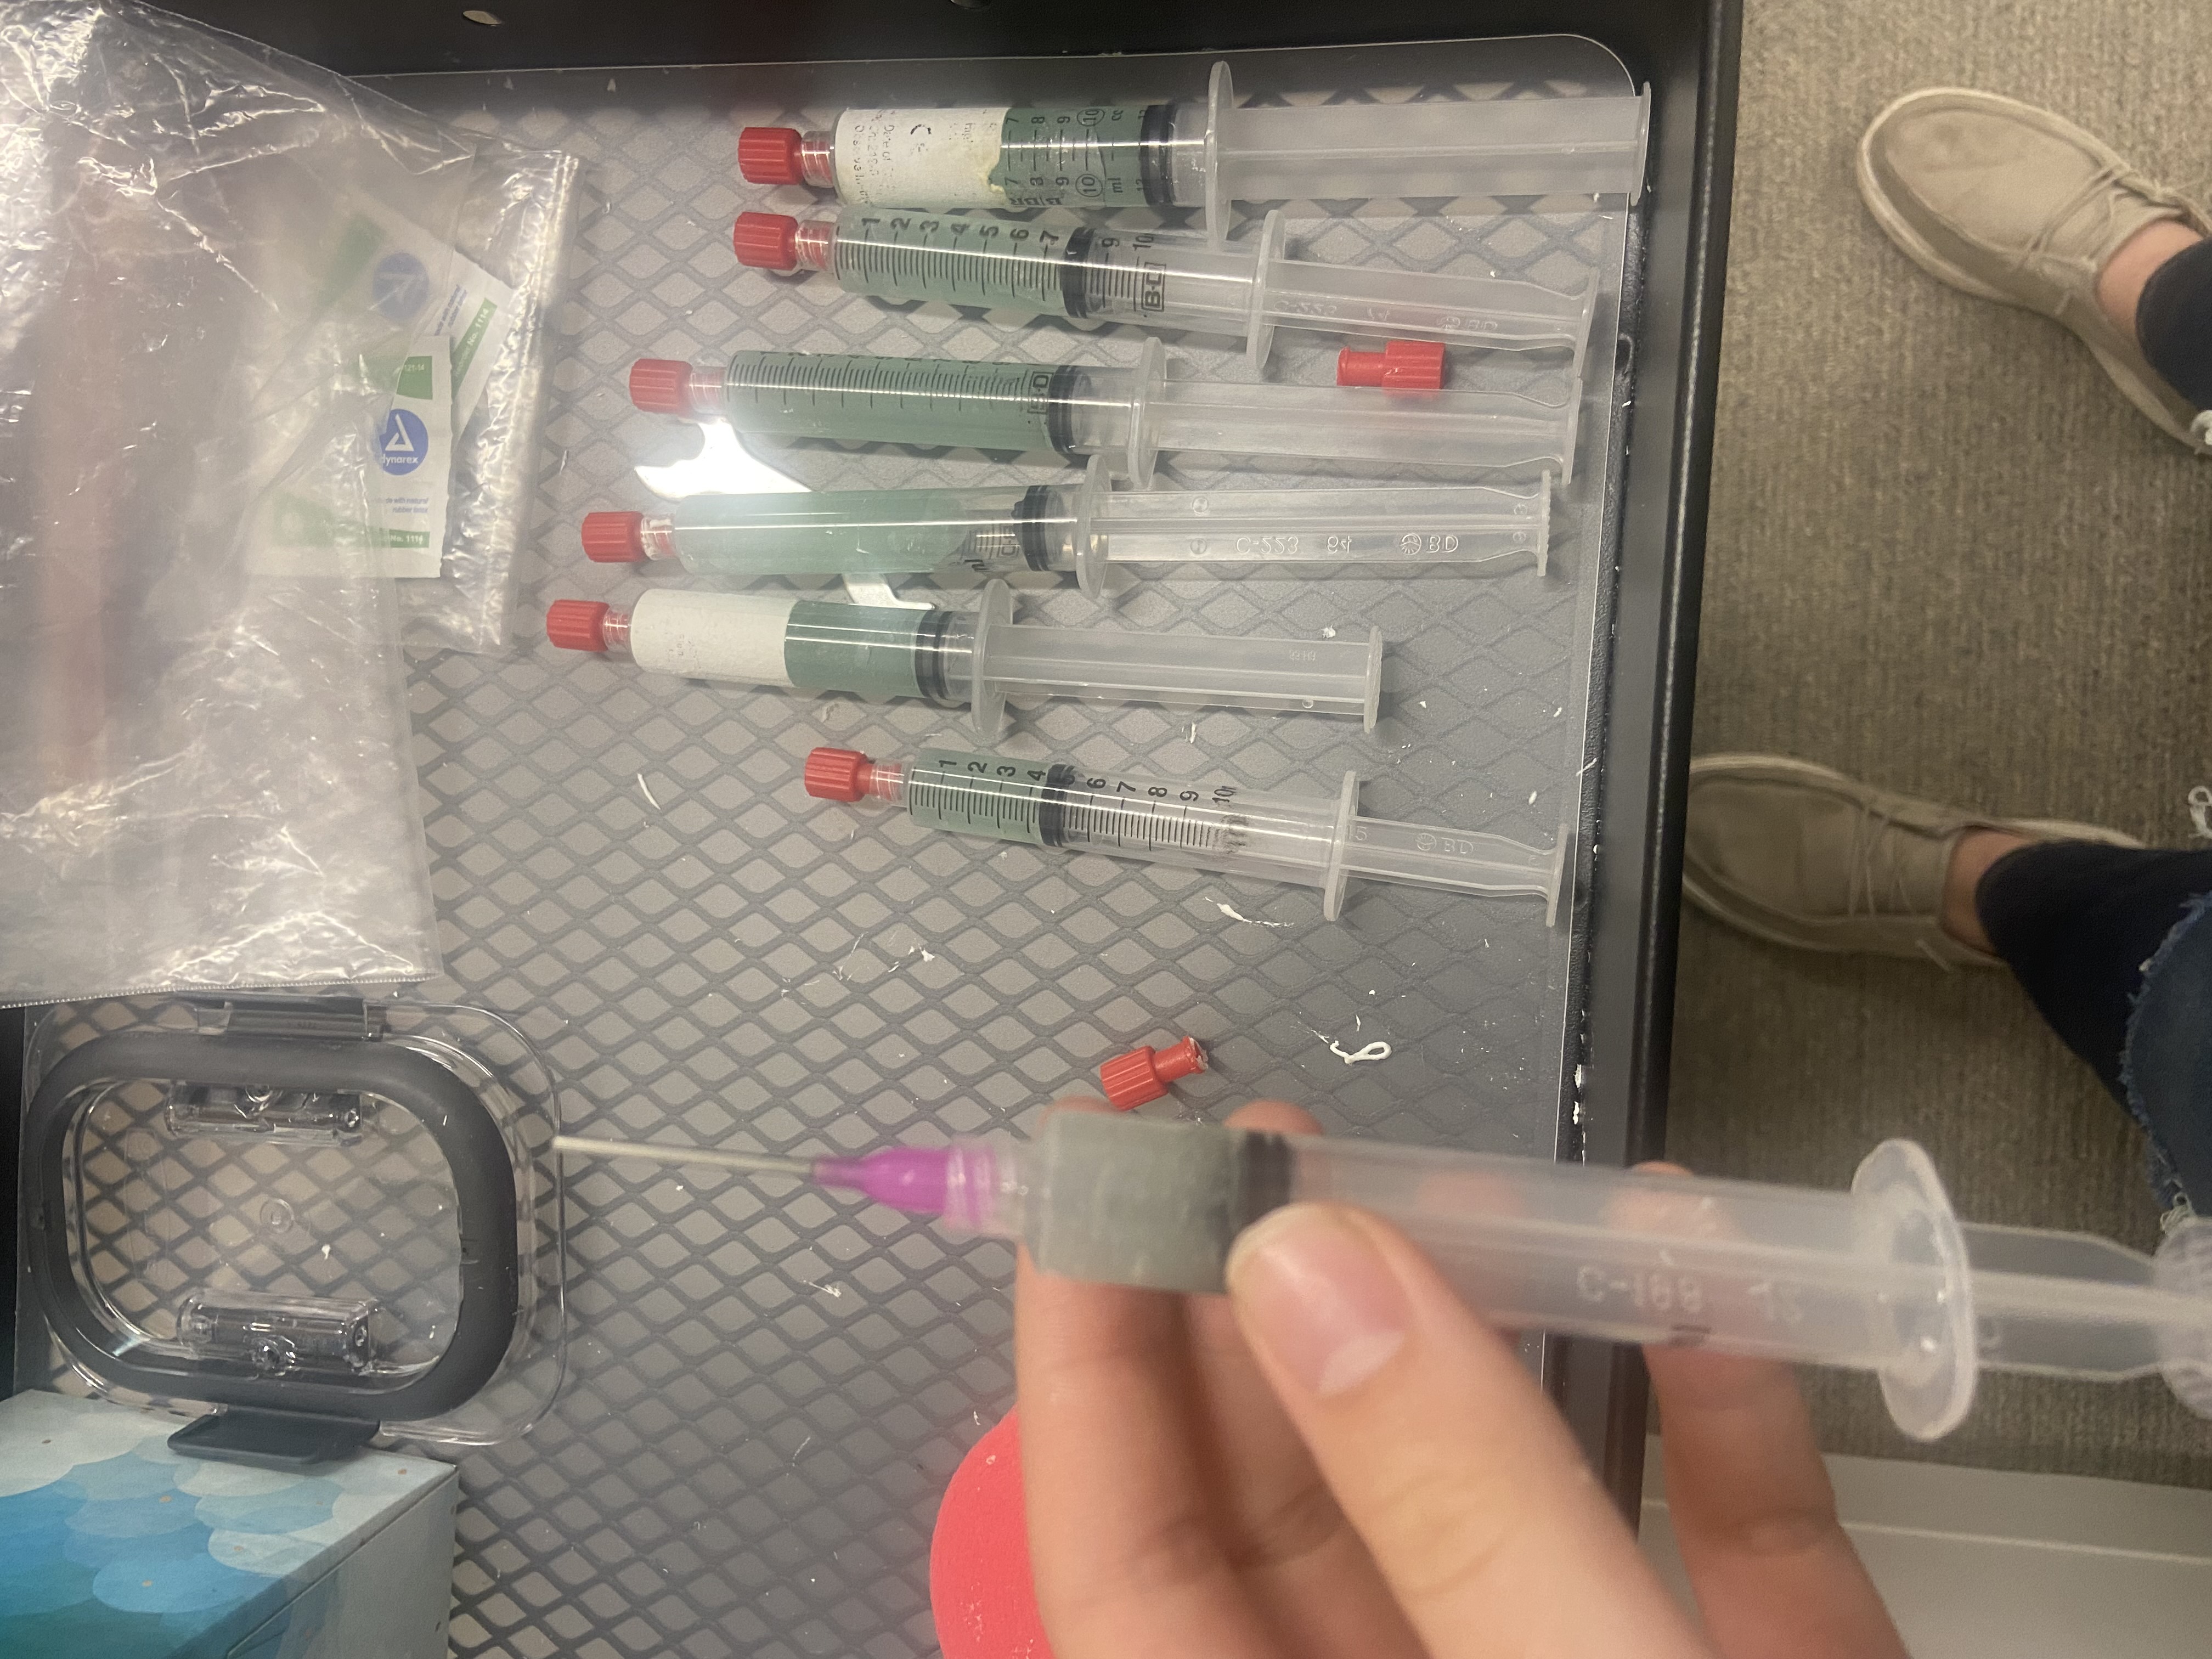
Now we can start gelling the participant. Go back into the experimental room and find the gel in syringes on the tool cart. Take off the red cap and screw on one of the purple needle tips like so:
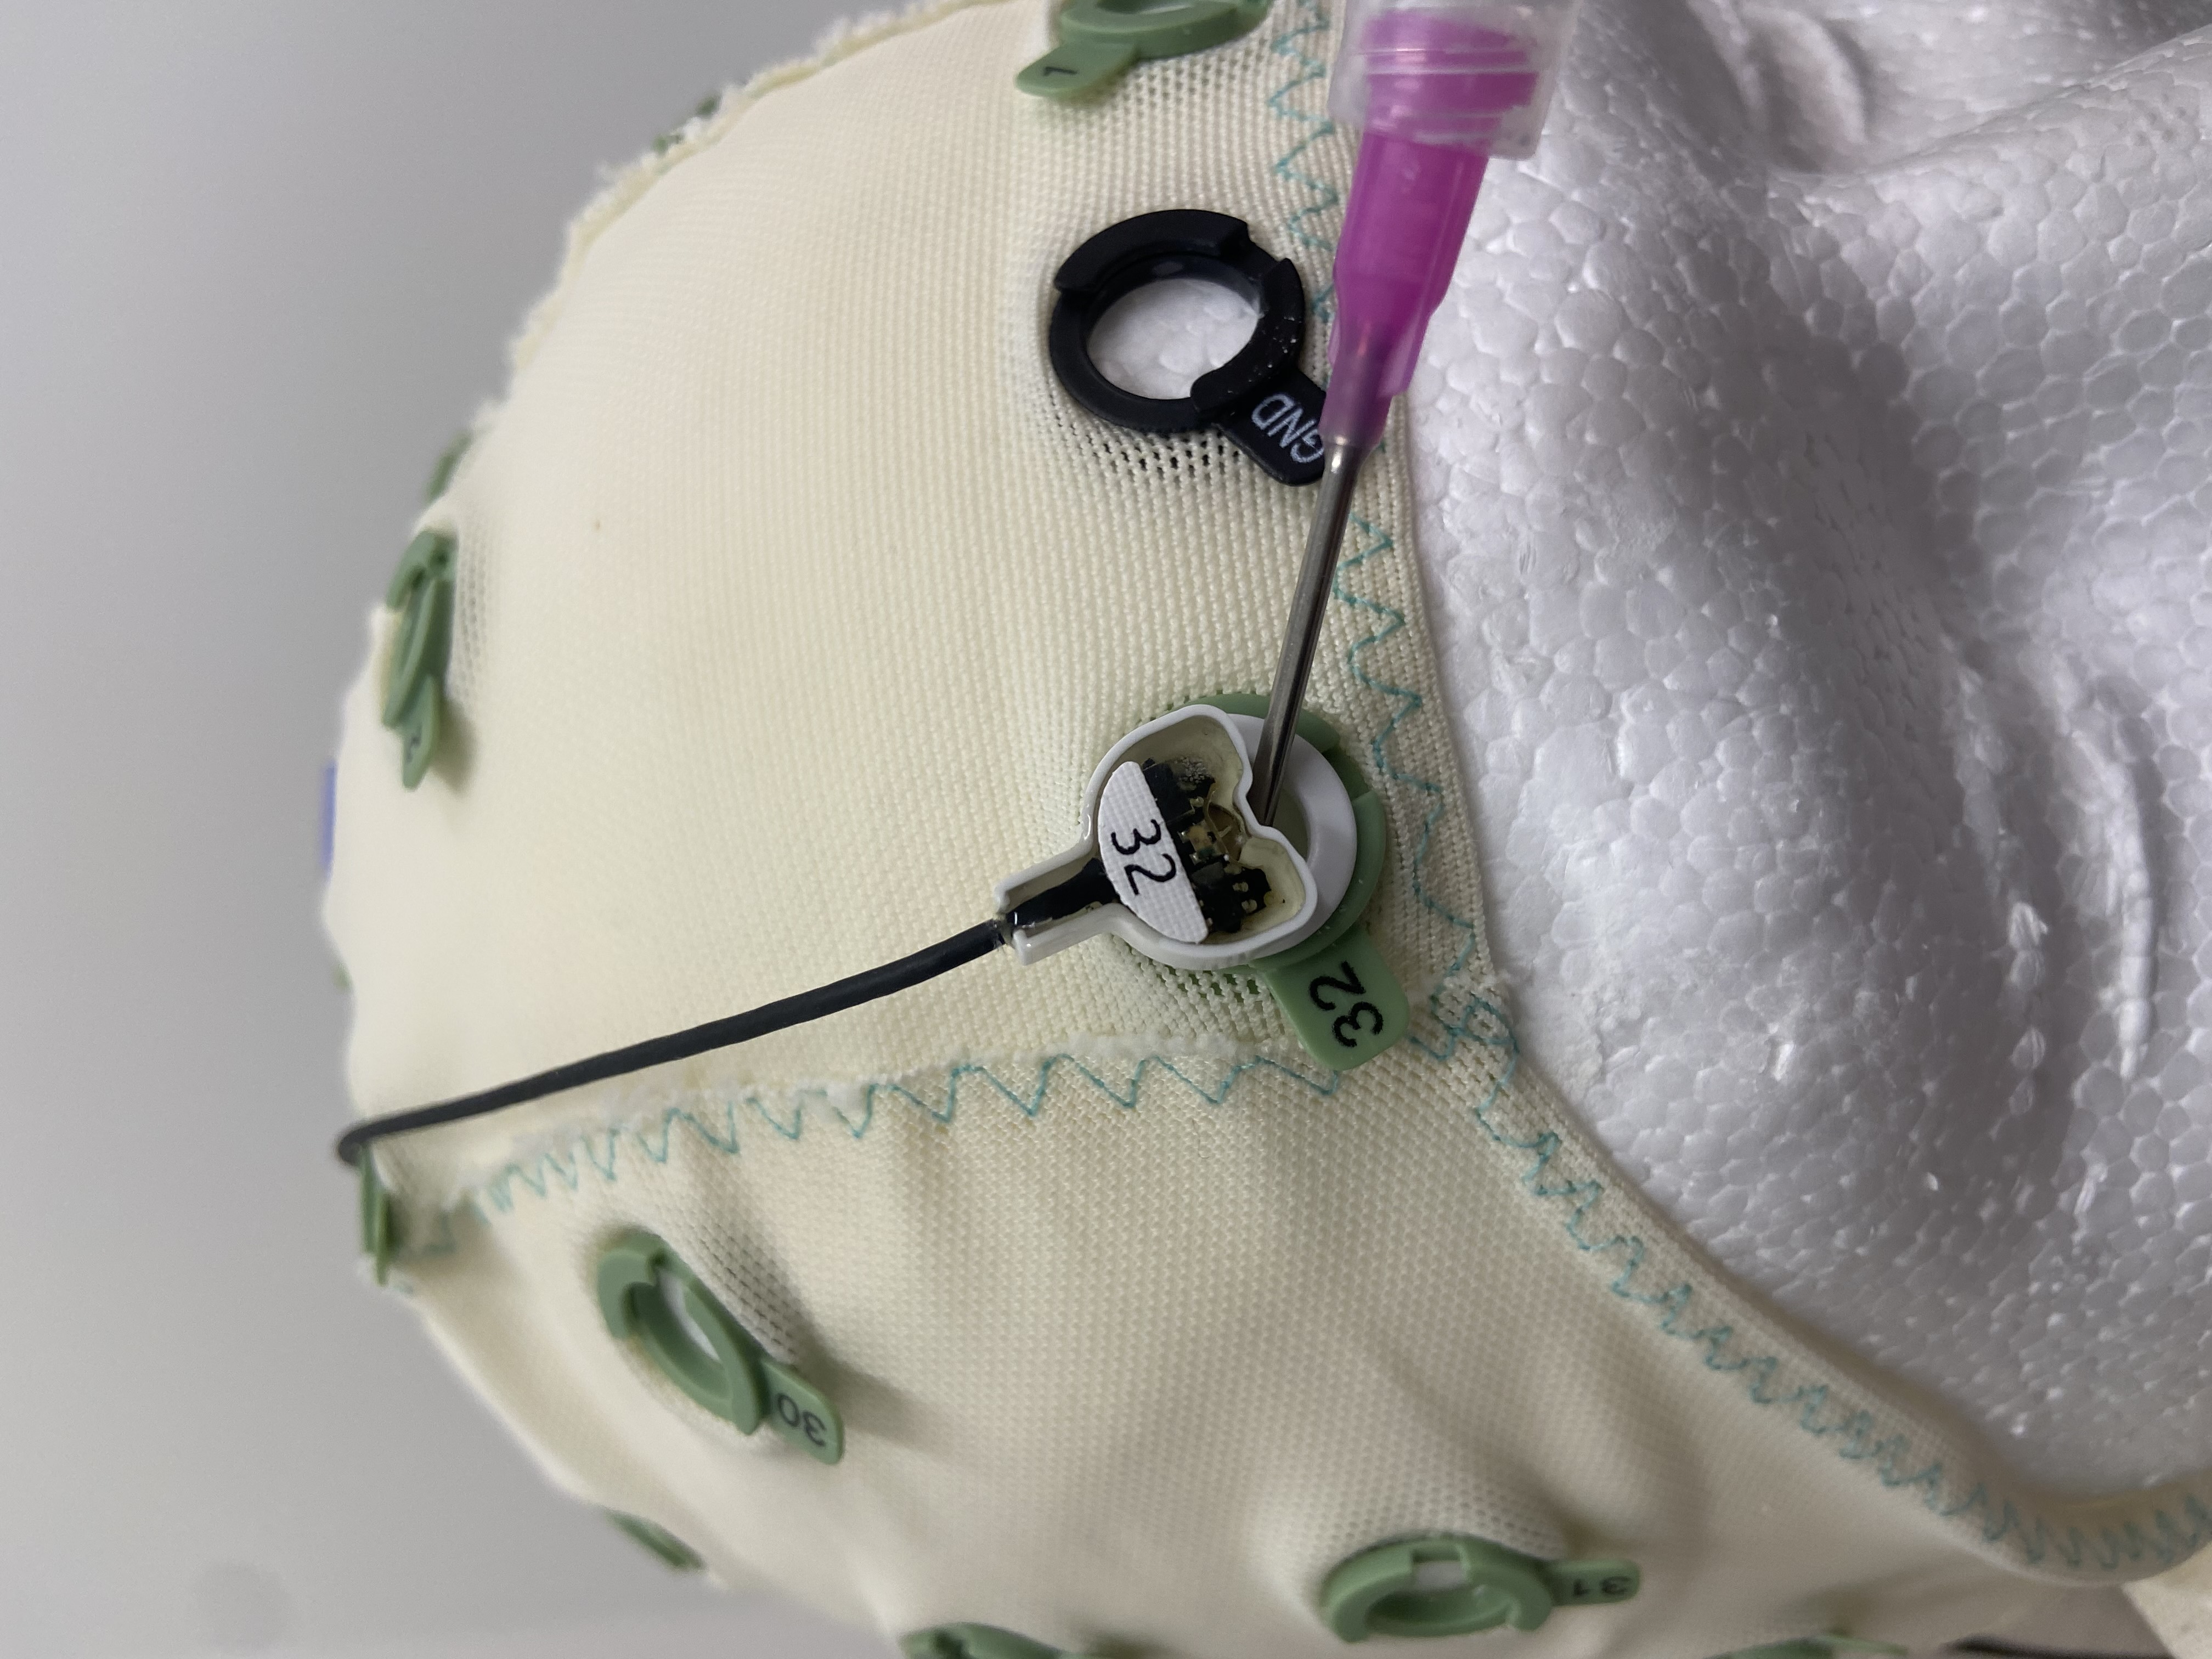
Start with the Ground electrode. Insert the needle under the electrode and swirl the needle around the opening and inject the gel. Continue putting gel under the electrode until the electrode turns green on BOTH the cap and the computer screen. Nb: The gel helps conduct the electrical activity of the brain so it can be easily read by the EEG electrodes. The needle tip allows us to part the hair and also (lightly) scrape away the top layer of dead skin and oils so we can get a good reading of the brain activity, hence the swirling.
Continue gelling each electrode, working from front to back until all electrodes are green. You can use a tissue to wipe away excess gel if needed. Tissues can be found on the top rack of the supply cart.
Once all electrodes are green, throw away the needle tips. If your syringe still has gel, put the red stopper back on. Otherwise, put the syringe in the dirty bowl to be cleaned later.
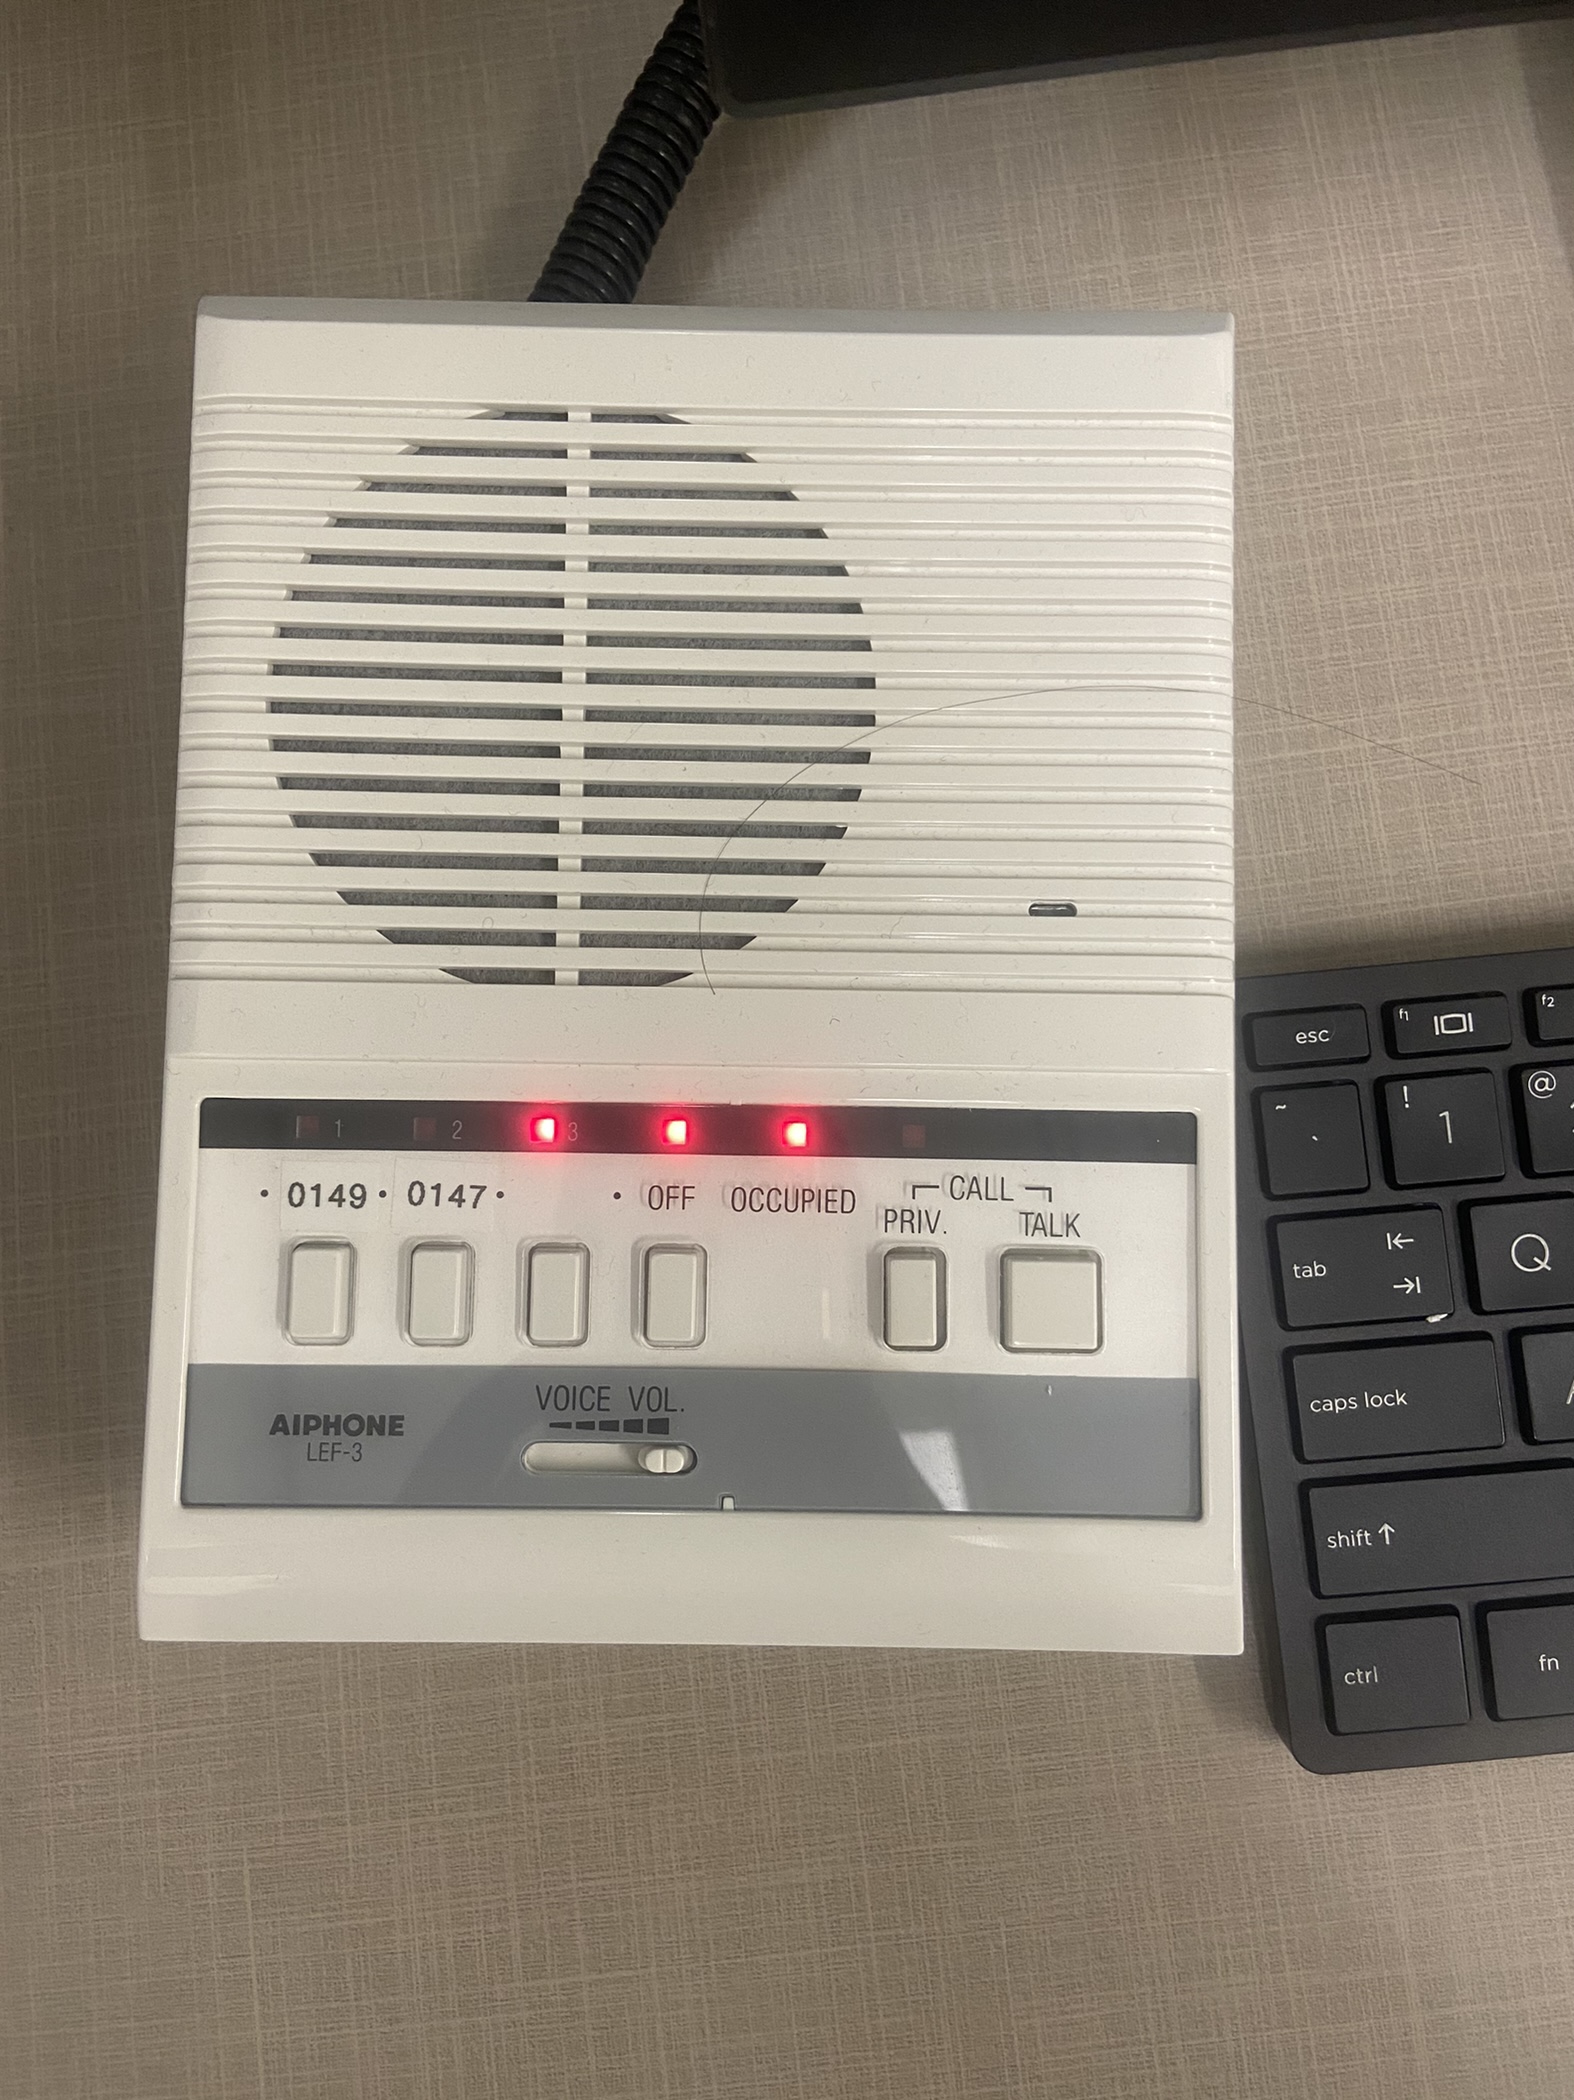
Next, go back to the control room and check that the audio system is working. Turn on the AIPHONE system by clicking the third button from the left (right next to OFF). Click the button for room 149 and hold the talk button while speaking. Make sure the participant can hear you. This way you can communicate with participants. More detailed instructions on the AI Phone system are taped to the wall in the control room.
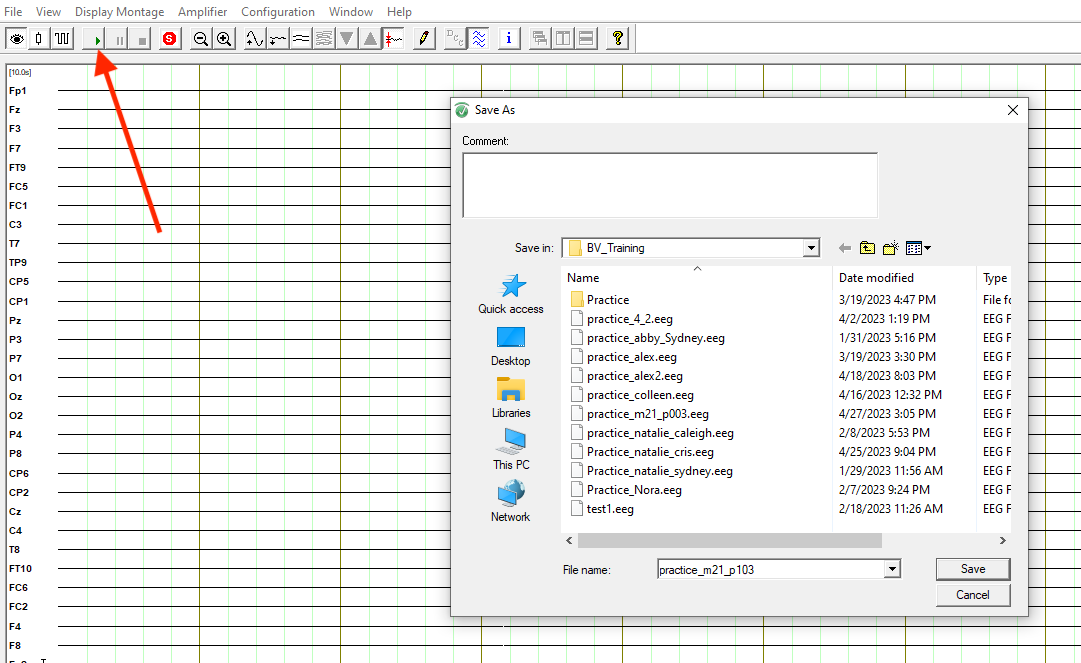
Bring up your BrainVision Recorder window. Click on the eye icon then on the green start button to begin recording. Name your file according to lab conventions (with participant number!) and choose where to save your file. The lexical decision task eeg file should be named M21_S###_LDT_EEG:
Ask the participant to move different parts of their body or perform different actions to check that the EEG is working properly and to view the effects on the brain waves. Some good options are (i) blink, (ii) talk, (iii) laugh etc. You can show them how their actions affect their brainwaves.
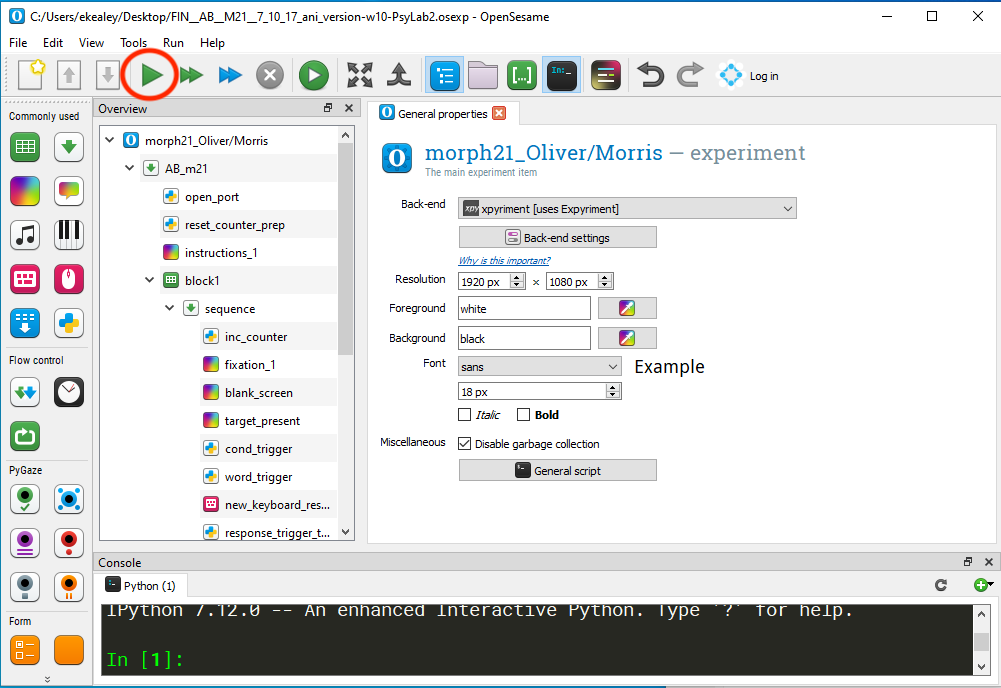
Once you have confirmed that the EEG is working as expected, it is time to start the experiment. Go back into the experimental room and open OpenSesame.
Click File > Open and select the correct version of the experiment from your desktop. You’ll either use the AB version of the experiment or the BA version. Please refer to participant numbering (we’re starting at 200 and going up consecutively – odd numbered participants receive AB and even numbered participants receive BA) and sorting guidelines to determine which set of the experiment to use.
Once the experiment has loaded, press the green play button to launch the presentation in full screen.
When prompted to enter the participant number, please enter the full naming convention for the LDT task: M21_S###_LDT_BEH. Select where to save the file. I recommend saving the file to your desktop.
The starting screen for the participant should start to load. At this point, you should turn off the second monitor in the experimental room (the one showing the EEG recording). Then you can retreat to the control room while the participant completes the lexical decision task.
Once the lexical decision task has come to an end, stop the BrainVision recording.
Immediately start a new brainvision recording for the visual statistical learning task. Name your file: M21_S###_VSL1_EEG. Do not append the new file to the old one.
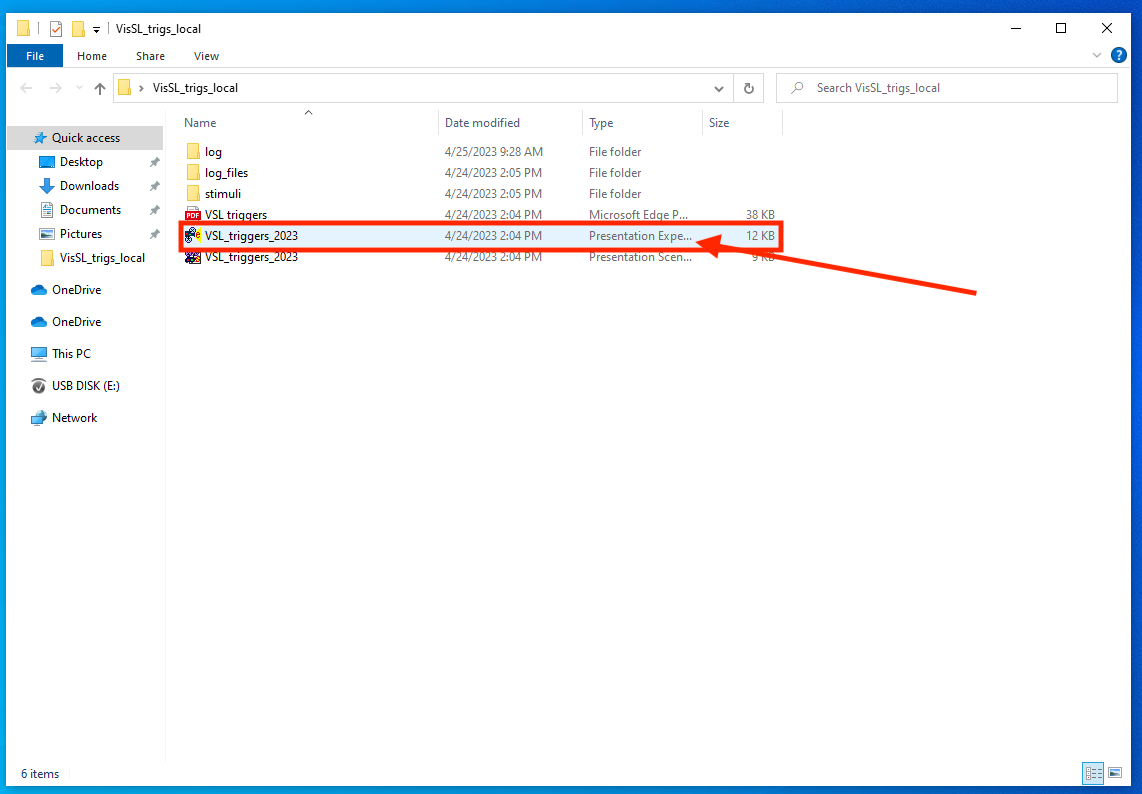
Re-enter the experimental room and pull up the Visual Statistical Learning task. Click on the desktop folder and open the file named “m21_VSL_experiment.exp”:
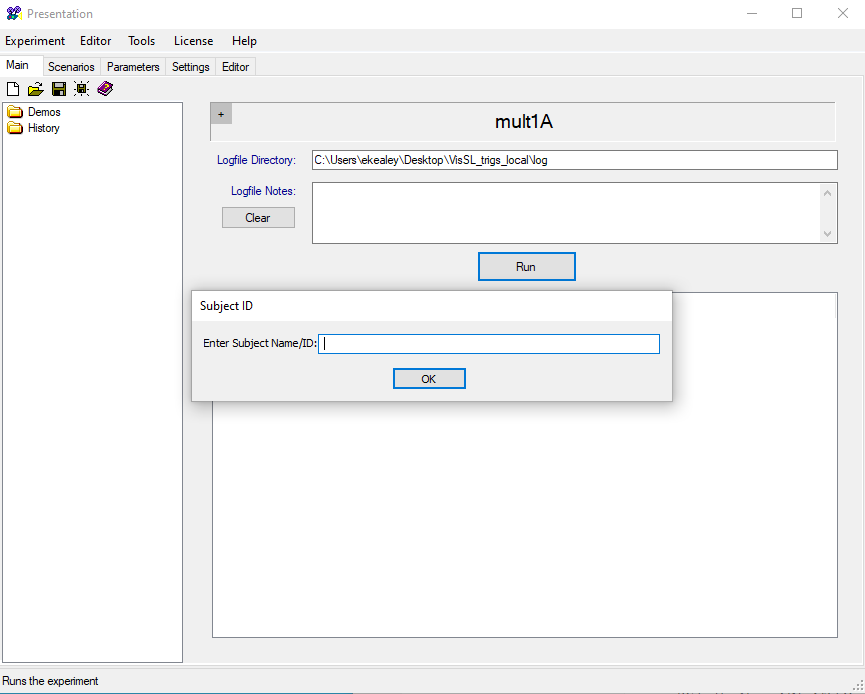
This should open the file in Presentation. Click “Run” and then enter the Subject ID when prompted. Make sure to enter the full experiment file name: M21_s###_VSL_BEH.
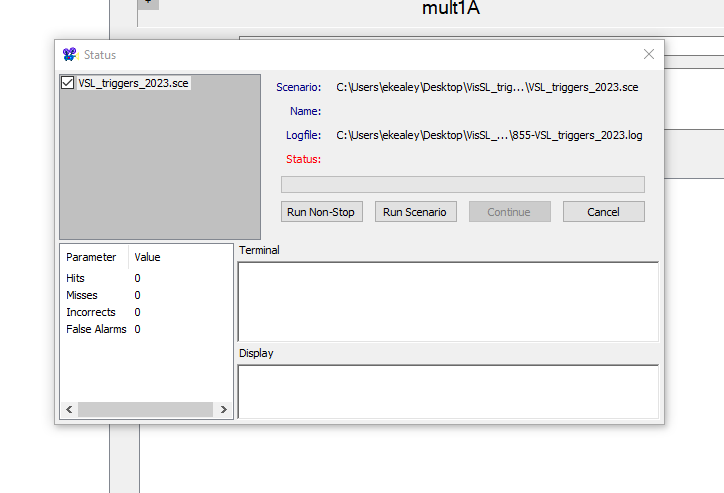
Click Run Non-Stop to launch the experiment:
Before leaving the room, click on the “num lk” button on the experimental keyboard to turn on the number pad. The light should illuminate to mark that it is active. Participants will need the number pad for this portion of the experiment! Click the enter key once to advance the experiment to the instructions slide.
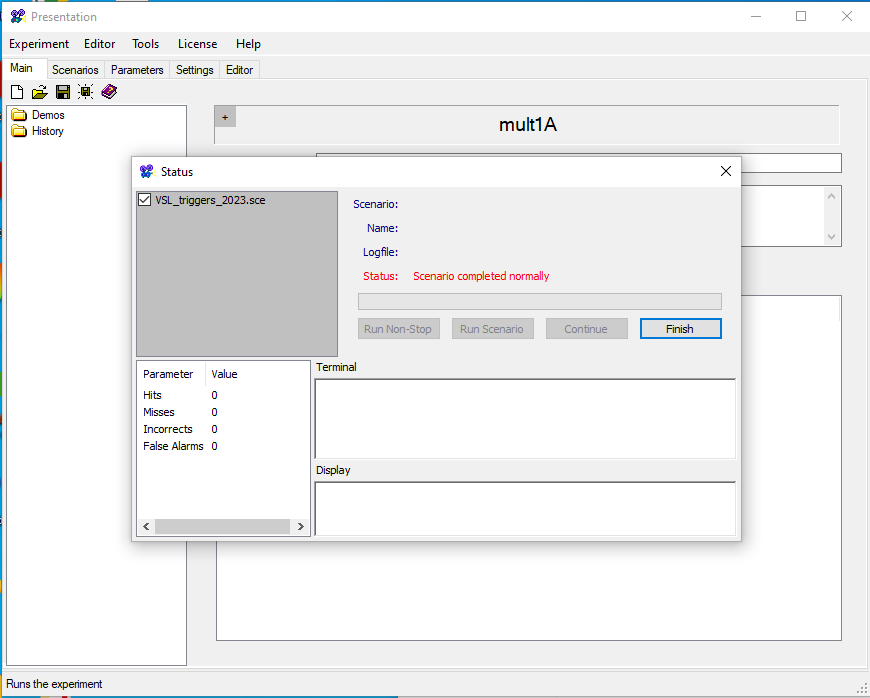
Retreat to the control room. For this portion of the experiment, the participant will see a series of shapes flash across the screen for 10 minutes. After this phase, they will be presented with a series of triplets where they will need to select which seems more familiar. Once they complete the activity, stop the EEG recording. Go into the experimental room and click ‘finish’ to save their data:
After the participant finishes the activities, help them take off the EEG cap. Offer them a towel from the supply closet to dry off their hair.
Put dirty towels in the hamper provided. Please let Joanna know when the hamper fills up so she can wash and restock the towels.
Disburse money to the participant for their efforts if they signed up for payment rather than credit. Make sure to fill out the HPL DISBURSEMENT LOG and have the participant sign that they received the money. Each participant will be paid $20- $25 for their participation.
Post-Participant Clean Up
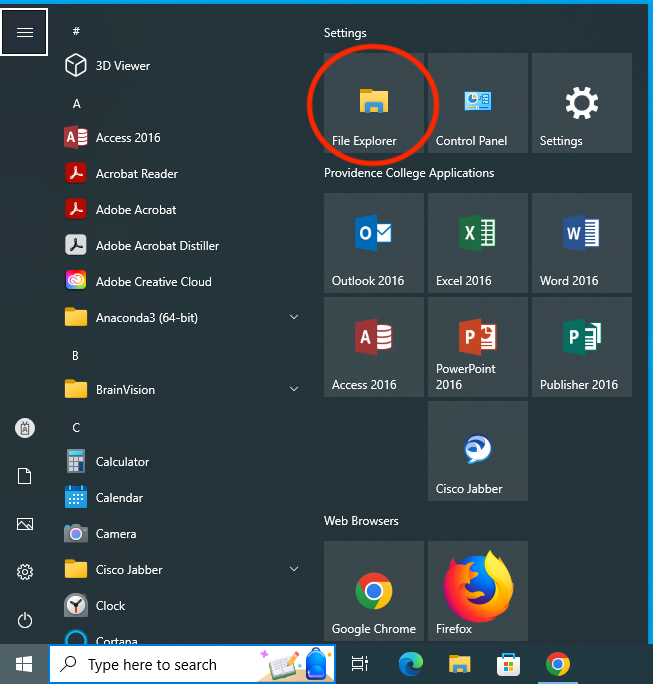
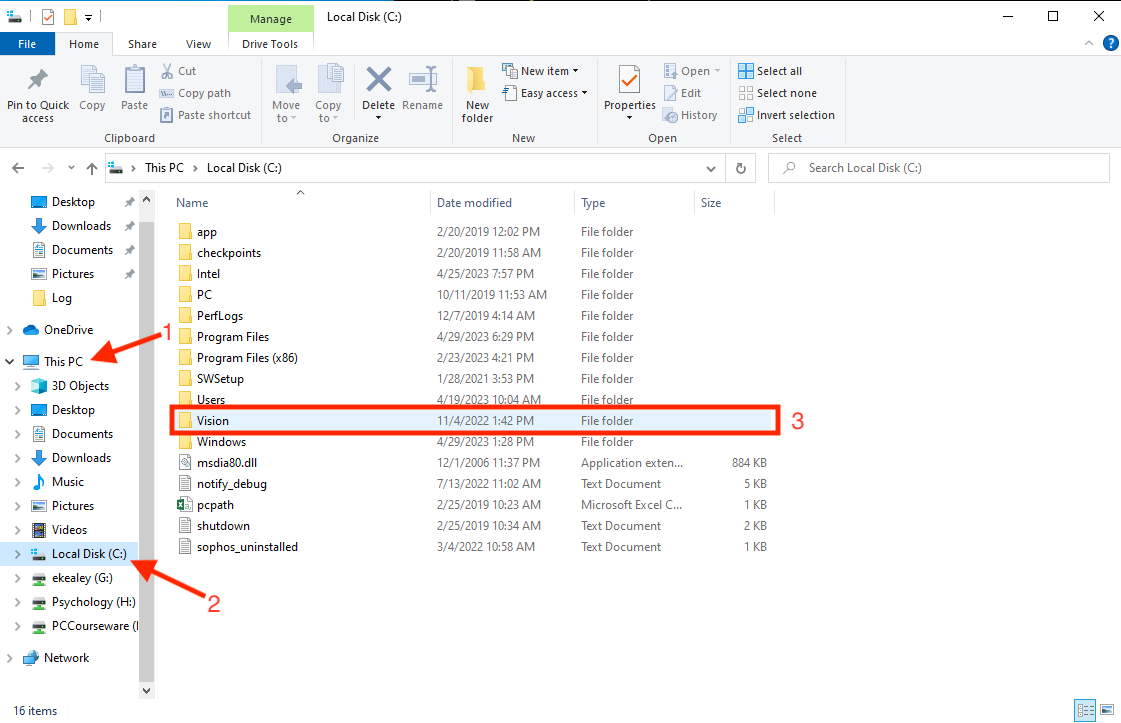
Once the participant has left, it’s time to clean up. Go back into the control room and pull up the battery log so you can charge the battery while cleaning up. Click on the Windows button in the lower left corner of the computer and open file explorer:
Then, navigate to This PC > Local Disc (C:) > Vision
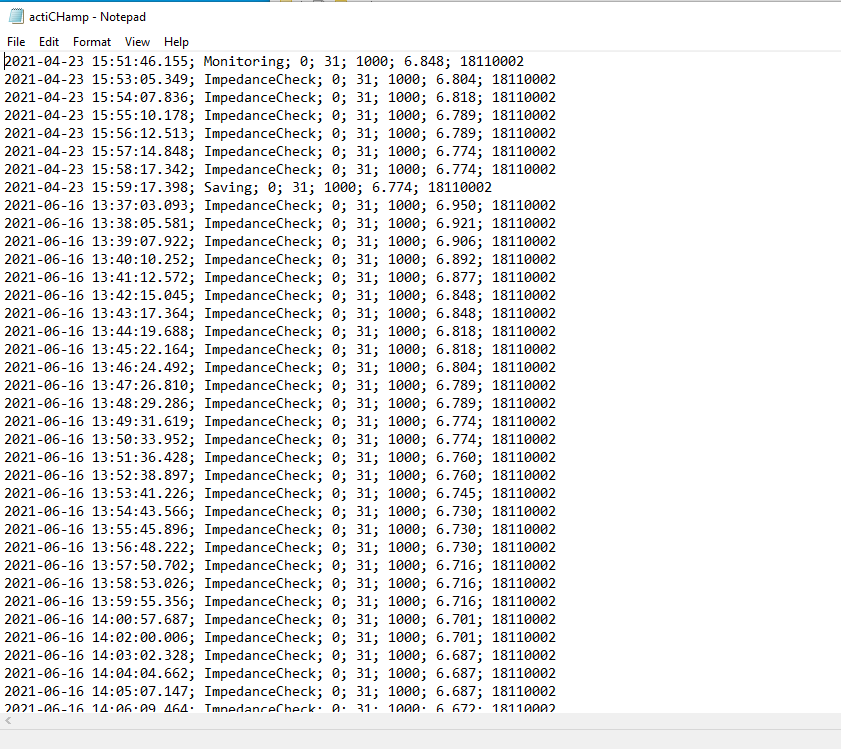
Navigate to Vision > Recorder > Log > actiCHAMP. Here’s what the battery log looks like:
Scroll all the way to the bottom to see the most recent entries. The battery level is the second to last number of the first line. In the example below, the battery is at 6.848 amps. 7amps is a full charge, so the battery effectively has a full charge.
If the battery is at less than 6 amps, please plug it into the charging cable while you clean up from the experimental run. If the battery is at 6 amps or higher, you can simply unplug the battery. Refer to the battery instructions sheet in the experimental room for more information.
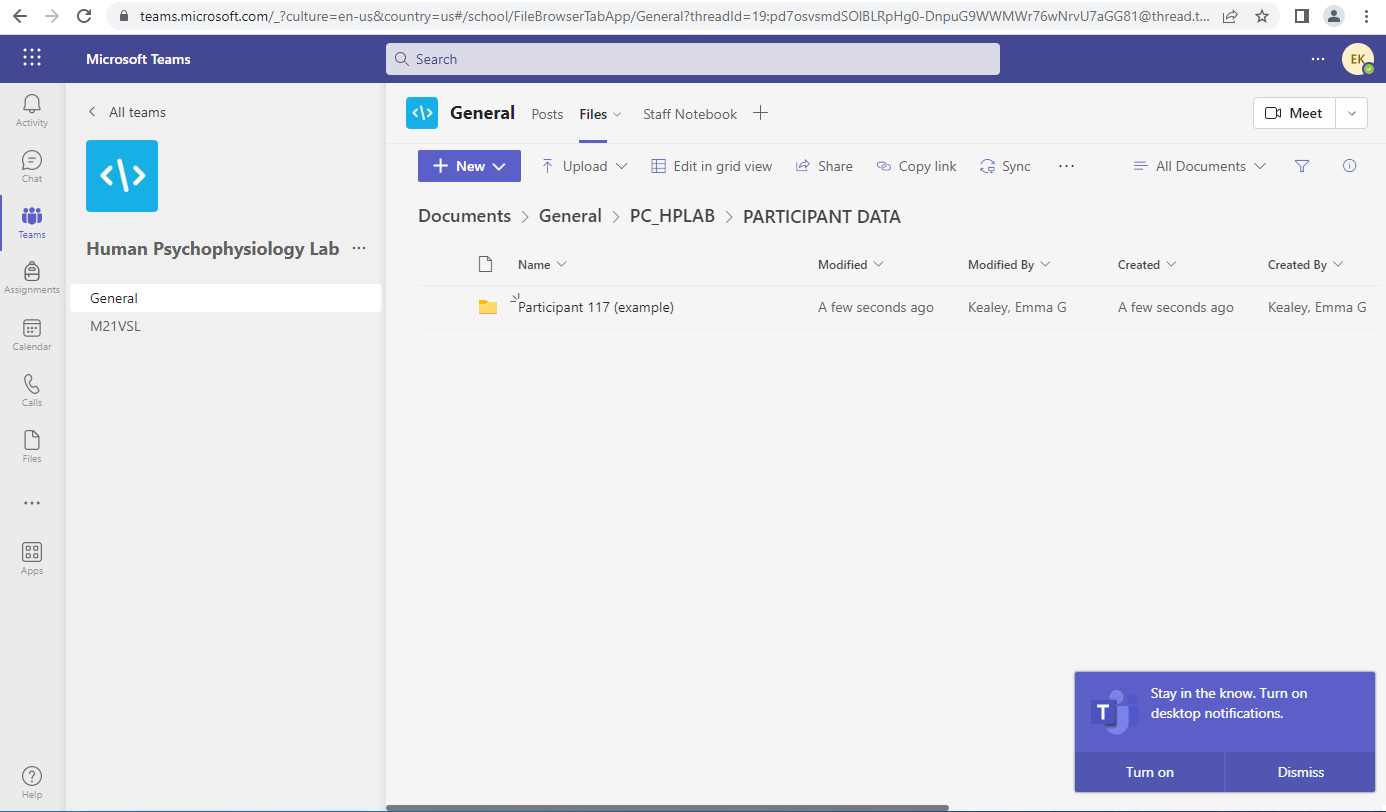
Now it’s time to upload all of the data files to Teams. Open Teams, log in with your PC credentials, and navigate to the folder titled “PARTICIPANT DATA TO BE UPLOADED” in the PC-HPLAB environment. Create a new folder and label it with the subject number “S2XX”:
Next, upload the following files from the experimental computer in 149 to your participant folder:
- an excel spreadsheet labeled “subject - s#”
- s#_results.txt
- s#-VSL_triggers_2023.log
Upload the following files from the control computer:
- m21_Sxxx_LDT_EEG.eeg
- m21_Sxxx_LDT_EEG.vhdr
- m21_Sxxx_LDT_EEG.vmrk
- m21_Sxxx_VSL_EEG.eeg
- m21_Sxxx_VSL_EEG.vhdr
- m21_Sxxx_VSL_EEG.vmrk
Altogether, you should upload 9 files to your participant folder:


Now you can start undoing the experiment set up. Start by unplugging the ground electrode from the battery, then the splitter band, then the power cord. Plug in the charging cable to recharge the battery while you complete cleaning if needed. Charging cable is in a cord holder on the back wall.
Next, remove the electrodes from the cap. Put the electrodes around your shoulders once again and put the cap in the washing bowl. Your syringes and needle tips from earlier should also be there.
Grab the toothbrush from the tool tray along with your materials to be washed (cap, electrodes, and syringes) and go to the nursing (personal) room on the second floor (SOWA room 0209). You can also go into any bathroom in the building, but the personal room is typically open, gender neutral, and large enough to do the cleaning comfortably.
The numbered part of the electrode can be rinsed with water and gently scrubbed with the toothbrush to remove any residual gel. The splitter box and the part of the ground electrode that is plugged into the battery cannot get wet. Please make sure to keep those parts of the cables far away from the water. Please keep the group of electrodes around your shoulders and the end of the ground electrode tucked into a pocket to protect it from the water.
For the syringes, flush the syringe with water 2-3 times.
Wash the cap by hand with only water (no soap) until all the gel has been rinsed out
Once everything has been rinsed with water, bring all of the supplies back to the experimental room.
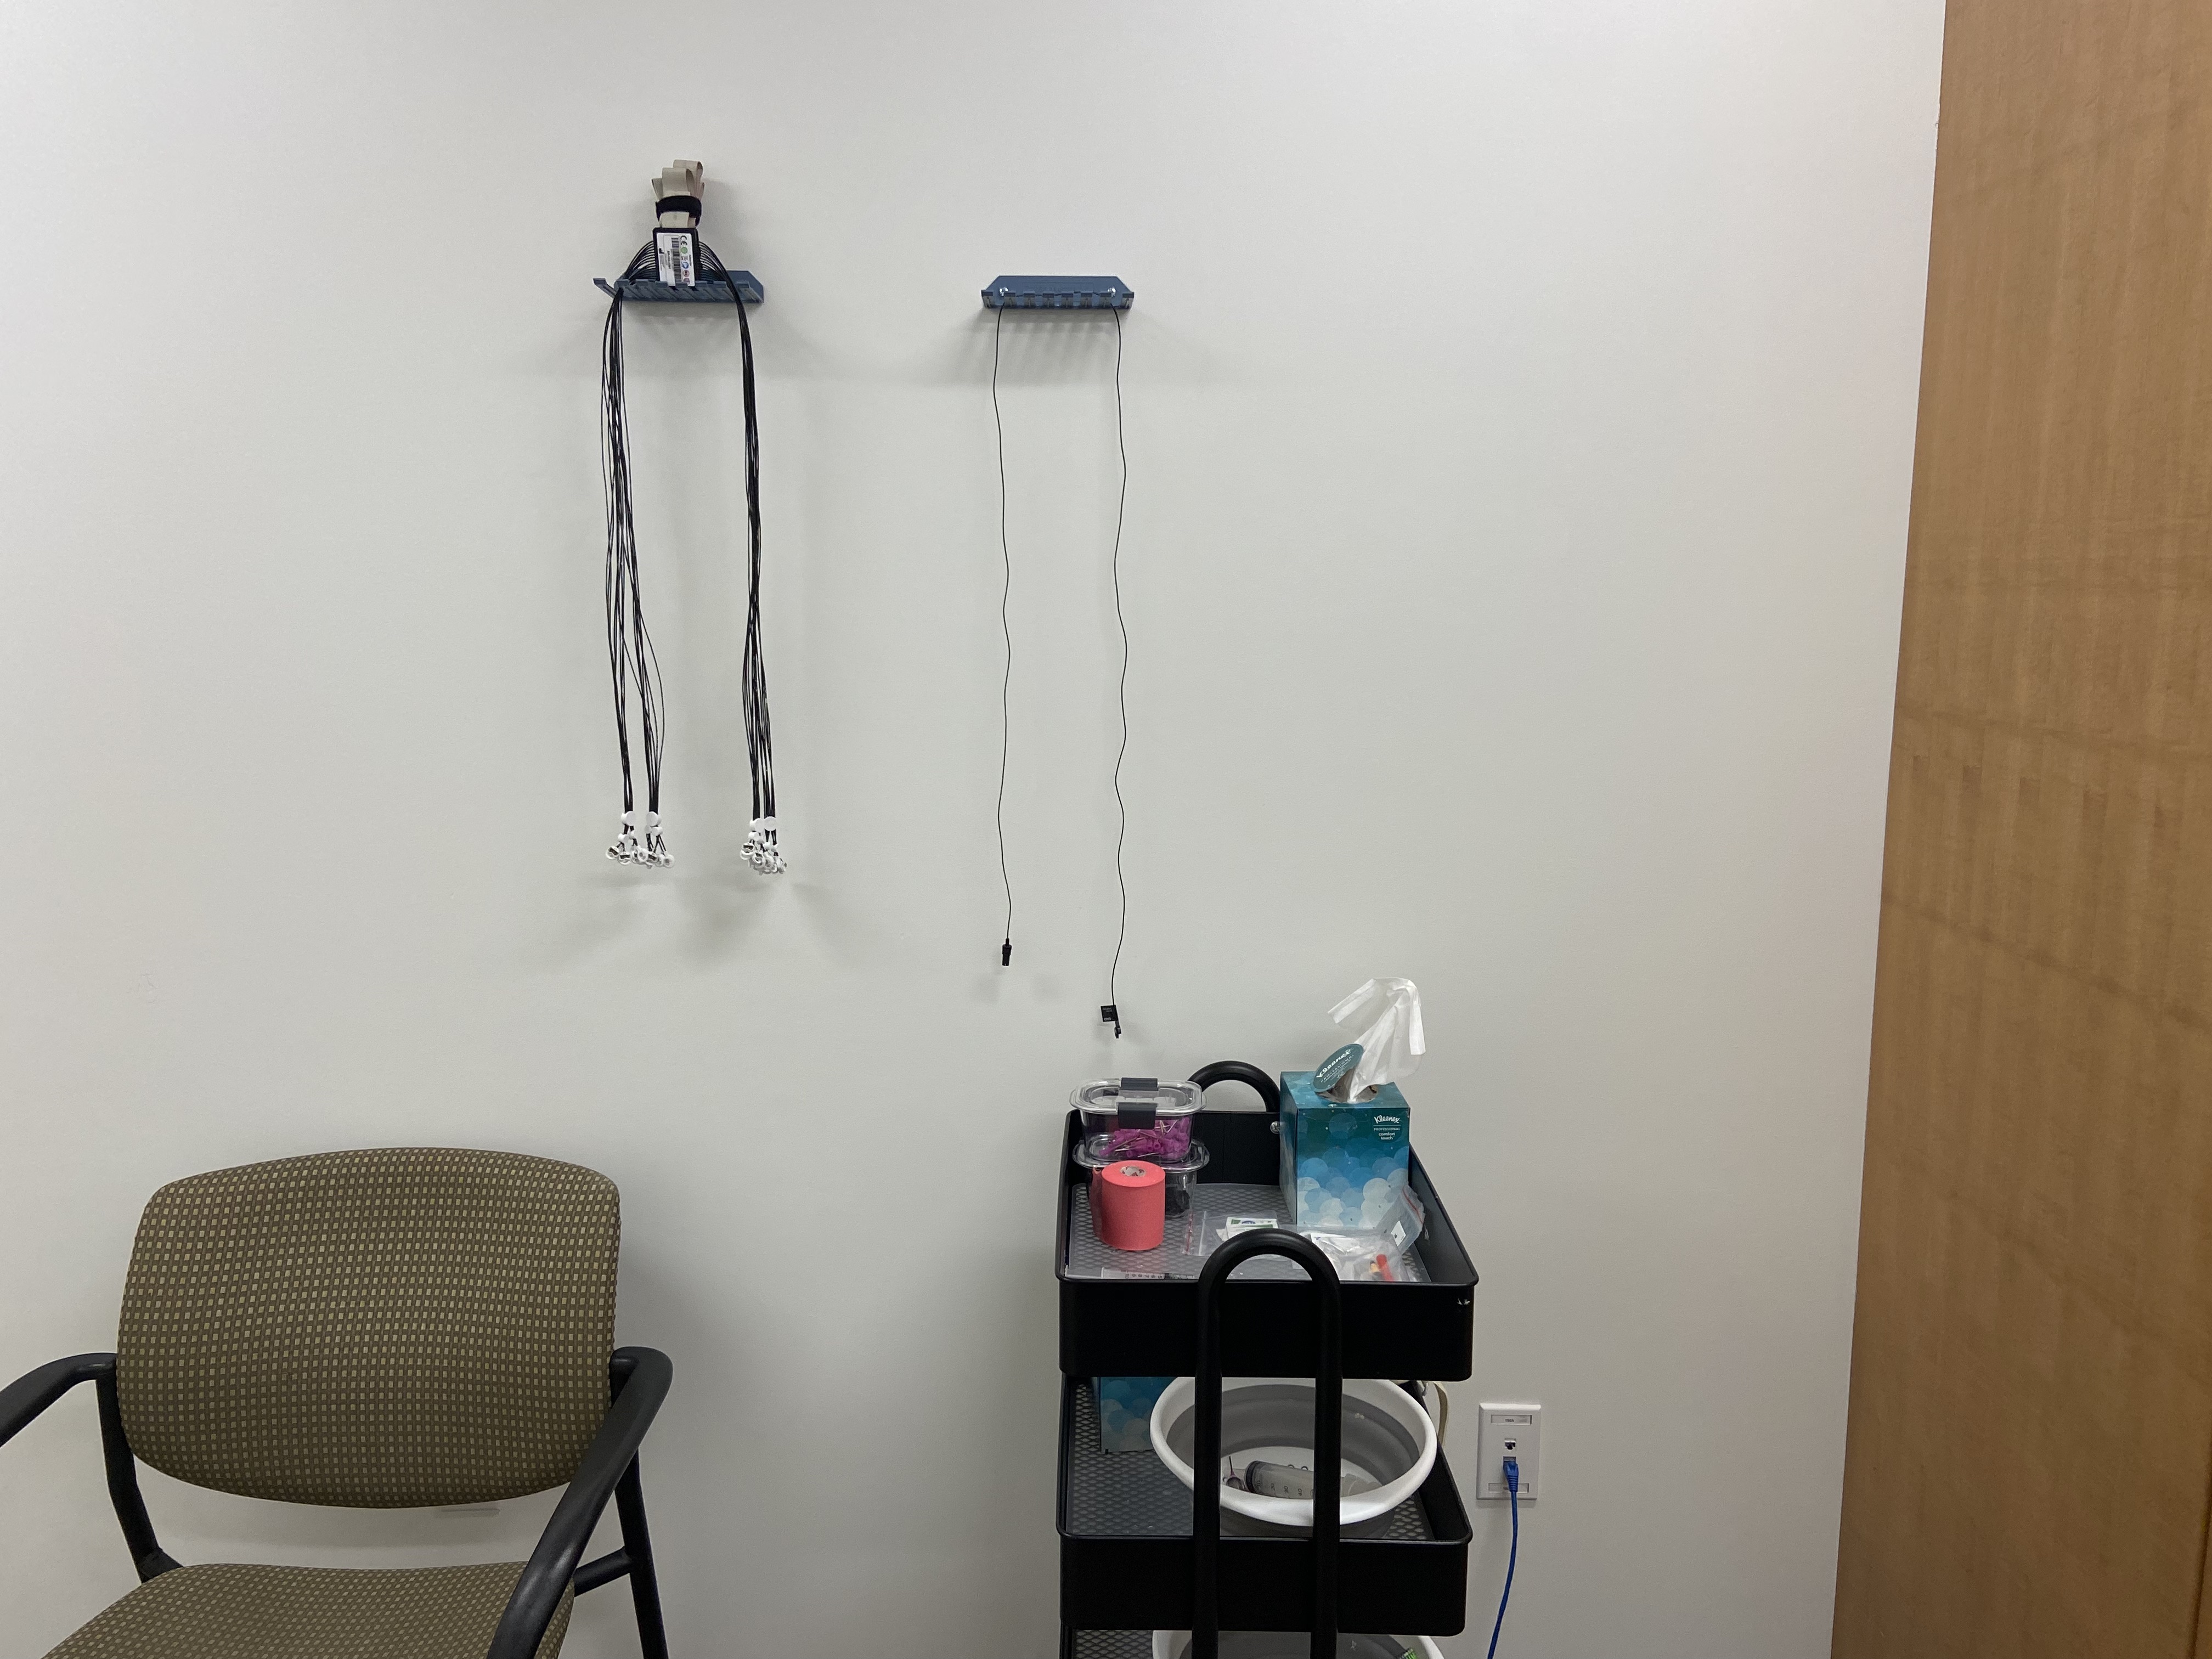
Hang up the electrode cluster and the ground electrode on their respective hook shelves. Make sure to pull all the cord control buttons down to keep the cords neat:
Take the cleaning wipes out of the supply closet and wipe the gel off of the EEG cords.
Place the EEG cap on the tool tray to dry
Lastly, tidy up the experimental room and ensure that all of the supplies are back where they belong.
If any supplies are running low, please let both Emma and Joanna know so they can restock them before the next participant.
Log out of all computers.
UNPLUG THE actiCHamp BATTERY
Gather your personal items and close the lab doors behind you as you leave. Make sure the doors are locked.